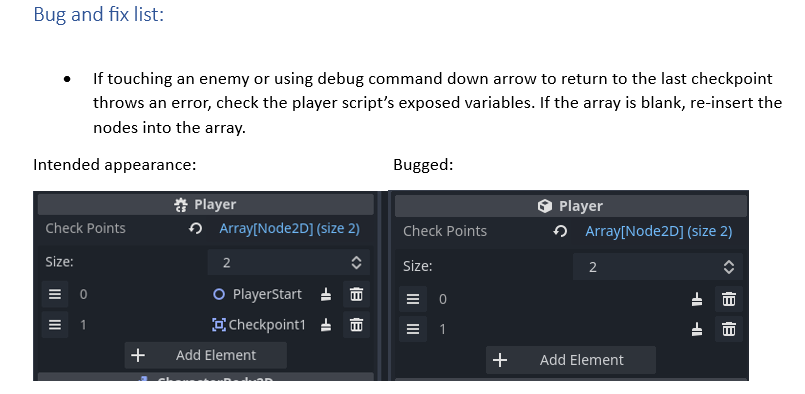
Developent
The Player Controller and checkpoints
Due to having to translate every line of code from GDScript into C#, I am flying partialy blind, as whilst I know exactly what needs to be done, figuring out what functions in the Godot C# library need to be called and how is where the struggle is at. I am also trying to adhere to Godot's C# style guide, which has resulted in code casing that feels bad.
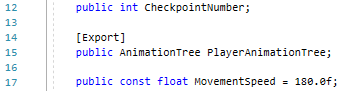
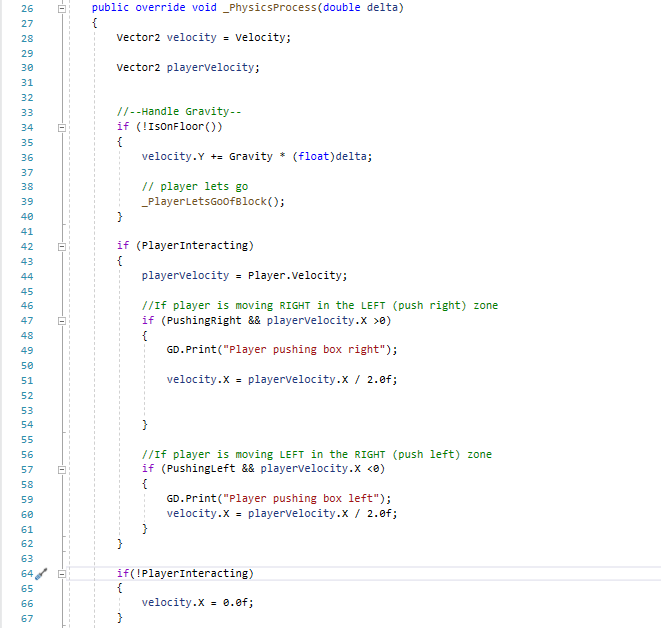
Here is what the player controller looked like after implementing it's base functionality.
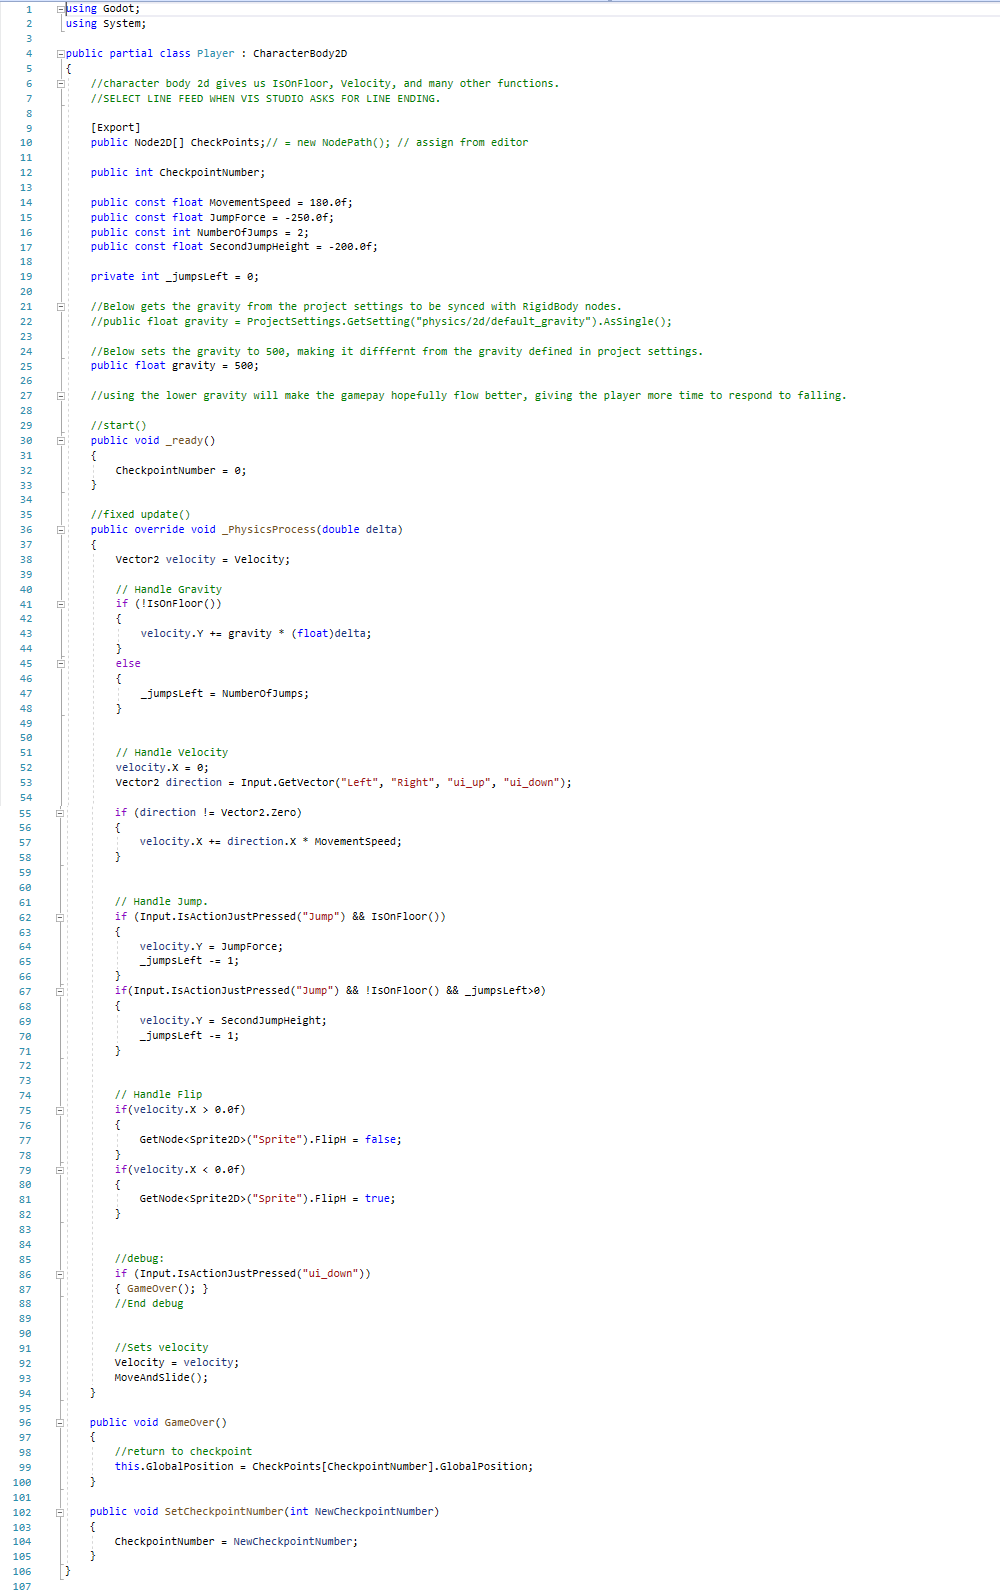
As you can see, there's a debug statement that runs the game over function. This was needed in order to isolate an issue that I was having regarding checkpoints and the calling of the GameOver() function outputting an error isnetad of returning the player to a checkpoint. By having this debug statement, it allowed me to test the GameOver() function from the player script in order to deduce weather the problem was with how the function was being called or if the problem was with the Game Over function itself, and this meant that I was able to isolate the error to the GameOver() function istelf. More acurately, the GameOver() function was pulling the checkpoint from an empty list. This was caused by the player having an odd reaction when the checkpoints were turned into a scene (the godot equivalent of a prefab). This started a separate list of particialy plucky issues that I will be able to refer back to instead of having to search back through the developmemt log document to find the solution
Hazards and headaches
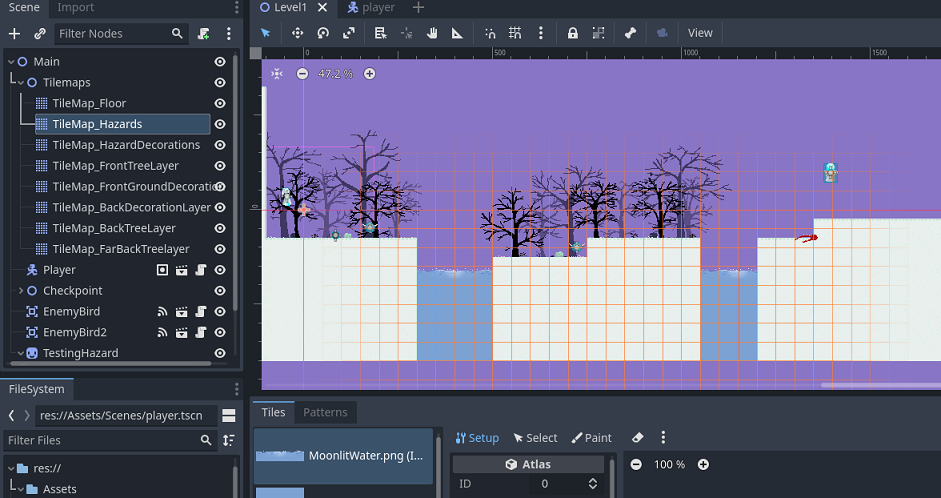
I thought that making a tilemap layer register as a hazard was going to be easy. The solution itself was simple, but the work it took to get here was rough.
I went through multiple itterations of trying to get the tilemap's collision to send the message to the player, but it turned out that the best way to make the player detect a tilemap as a reason to run a function is to set up a detector within the player and have that call the player's script using signals, and as it turns out, there is a signal that is triggered with tilemaps, and that is the "body_entered" signal.
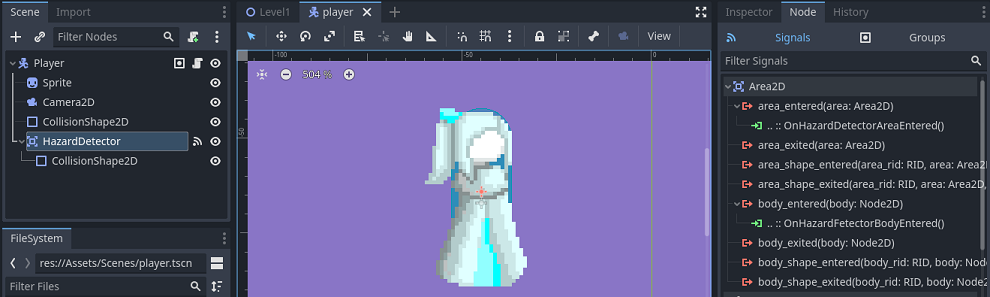
The signals come from the hazard detector, which exists on layer 5 and has a mask of layer 13, as shown in the screenshot of HazardDetector's inspector below:
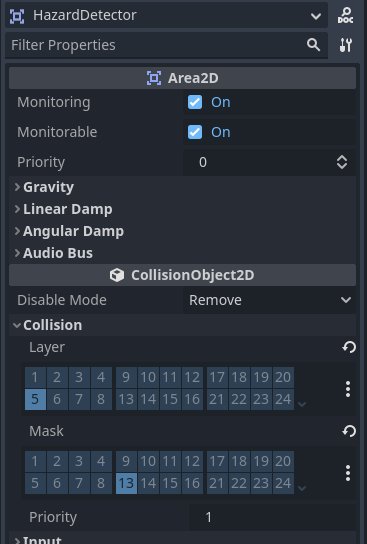
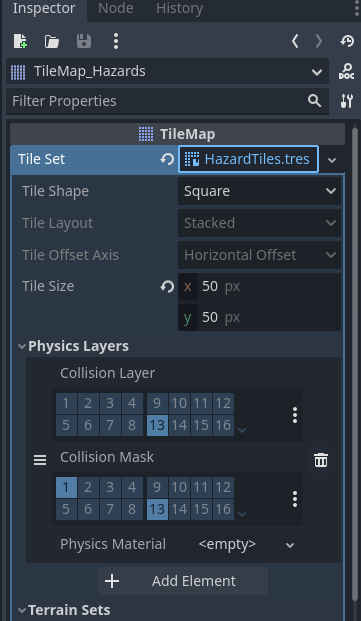
The tilemap's collision exists on layer 13 and masks with layer 13 and 1. Collision layer 13 is what the player's hazard detector picks up on, and it masks on 1 so world objects can't fall through it.
I have a call on both "body_entered" and "area_entered" in order to future-proof my code so if I wish to add non-tilemap static hazards, I will only need to make sure that the static hazard is on the right collision and mask layers. This saves me work in the future.
This is what the player controller looks like after adding the hazard detection:
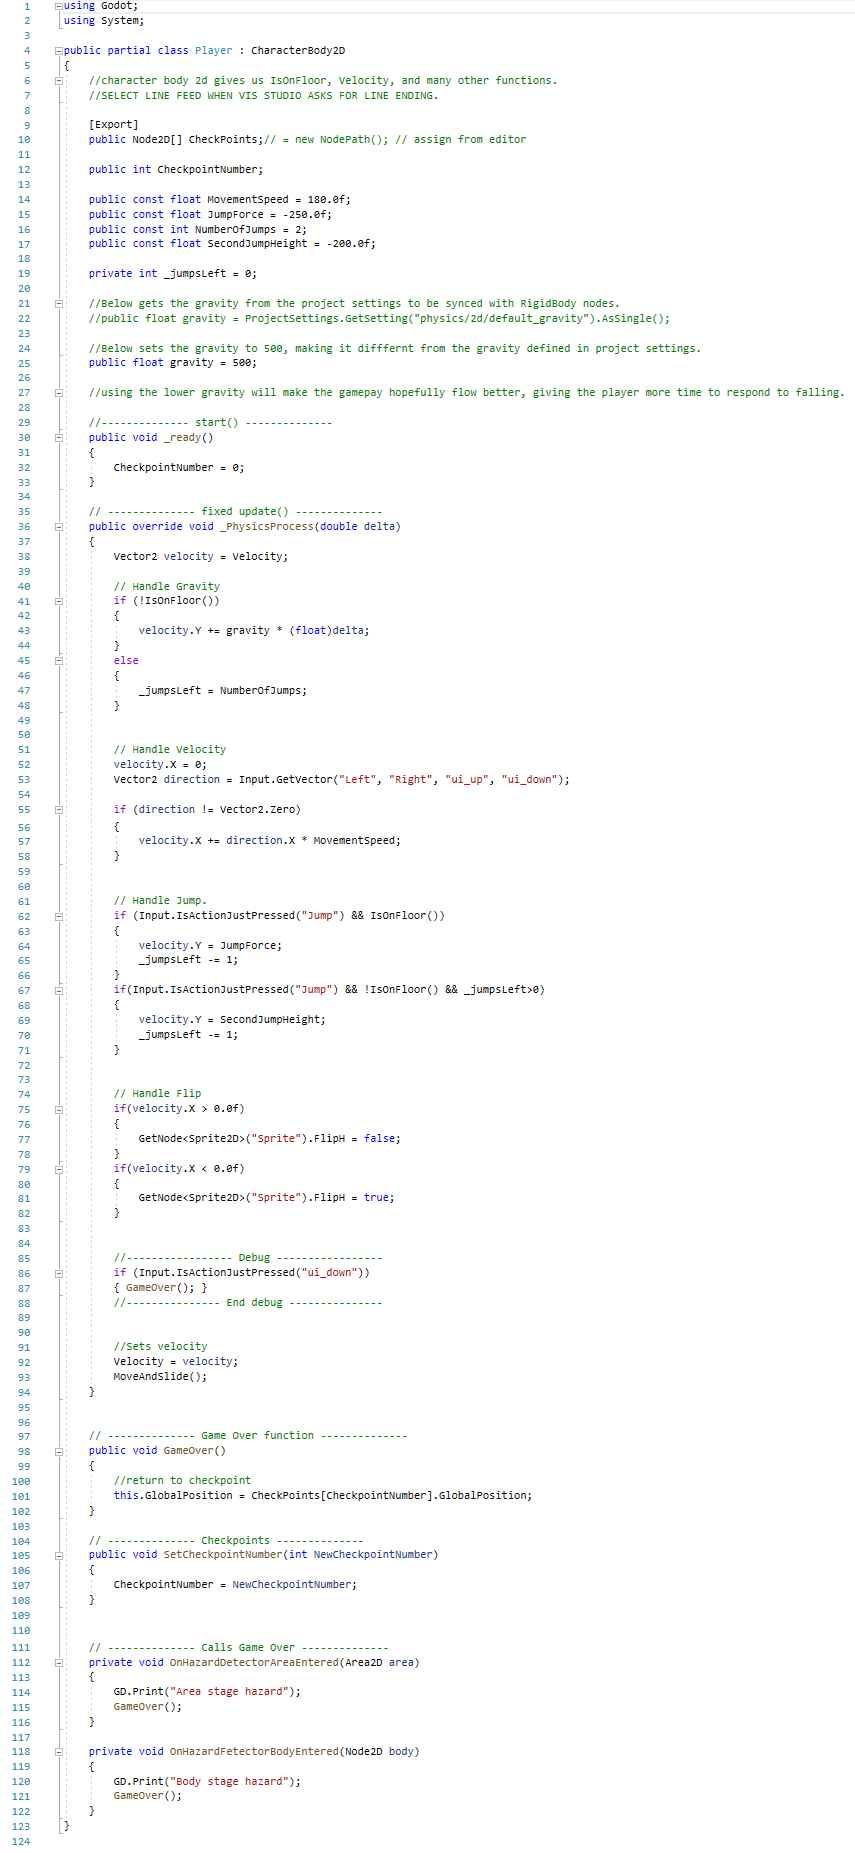
Whilst I was at it, I made the code look a bit more pretty and presentable, denoting major sections with headders that look like dividers so functions are clearly grouped or labeled and debug actions stand out more.
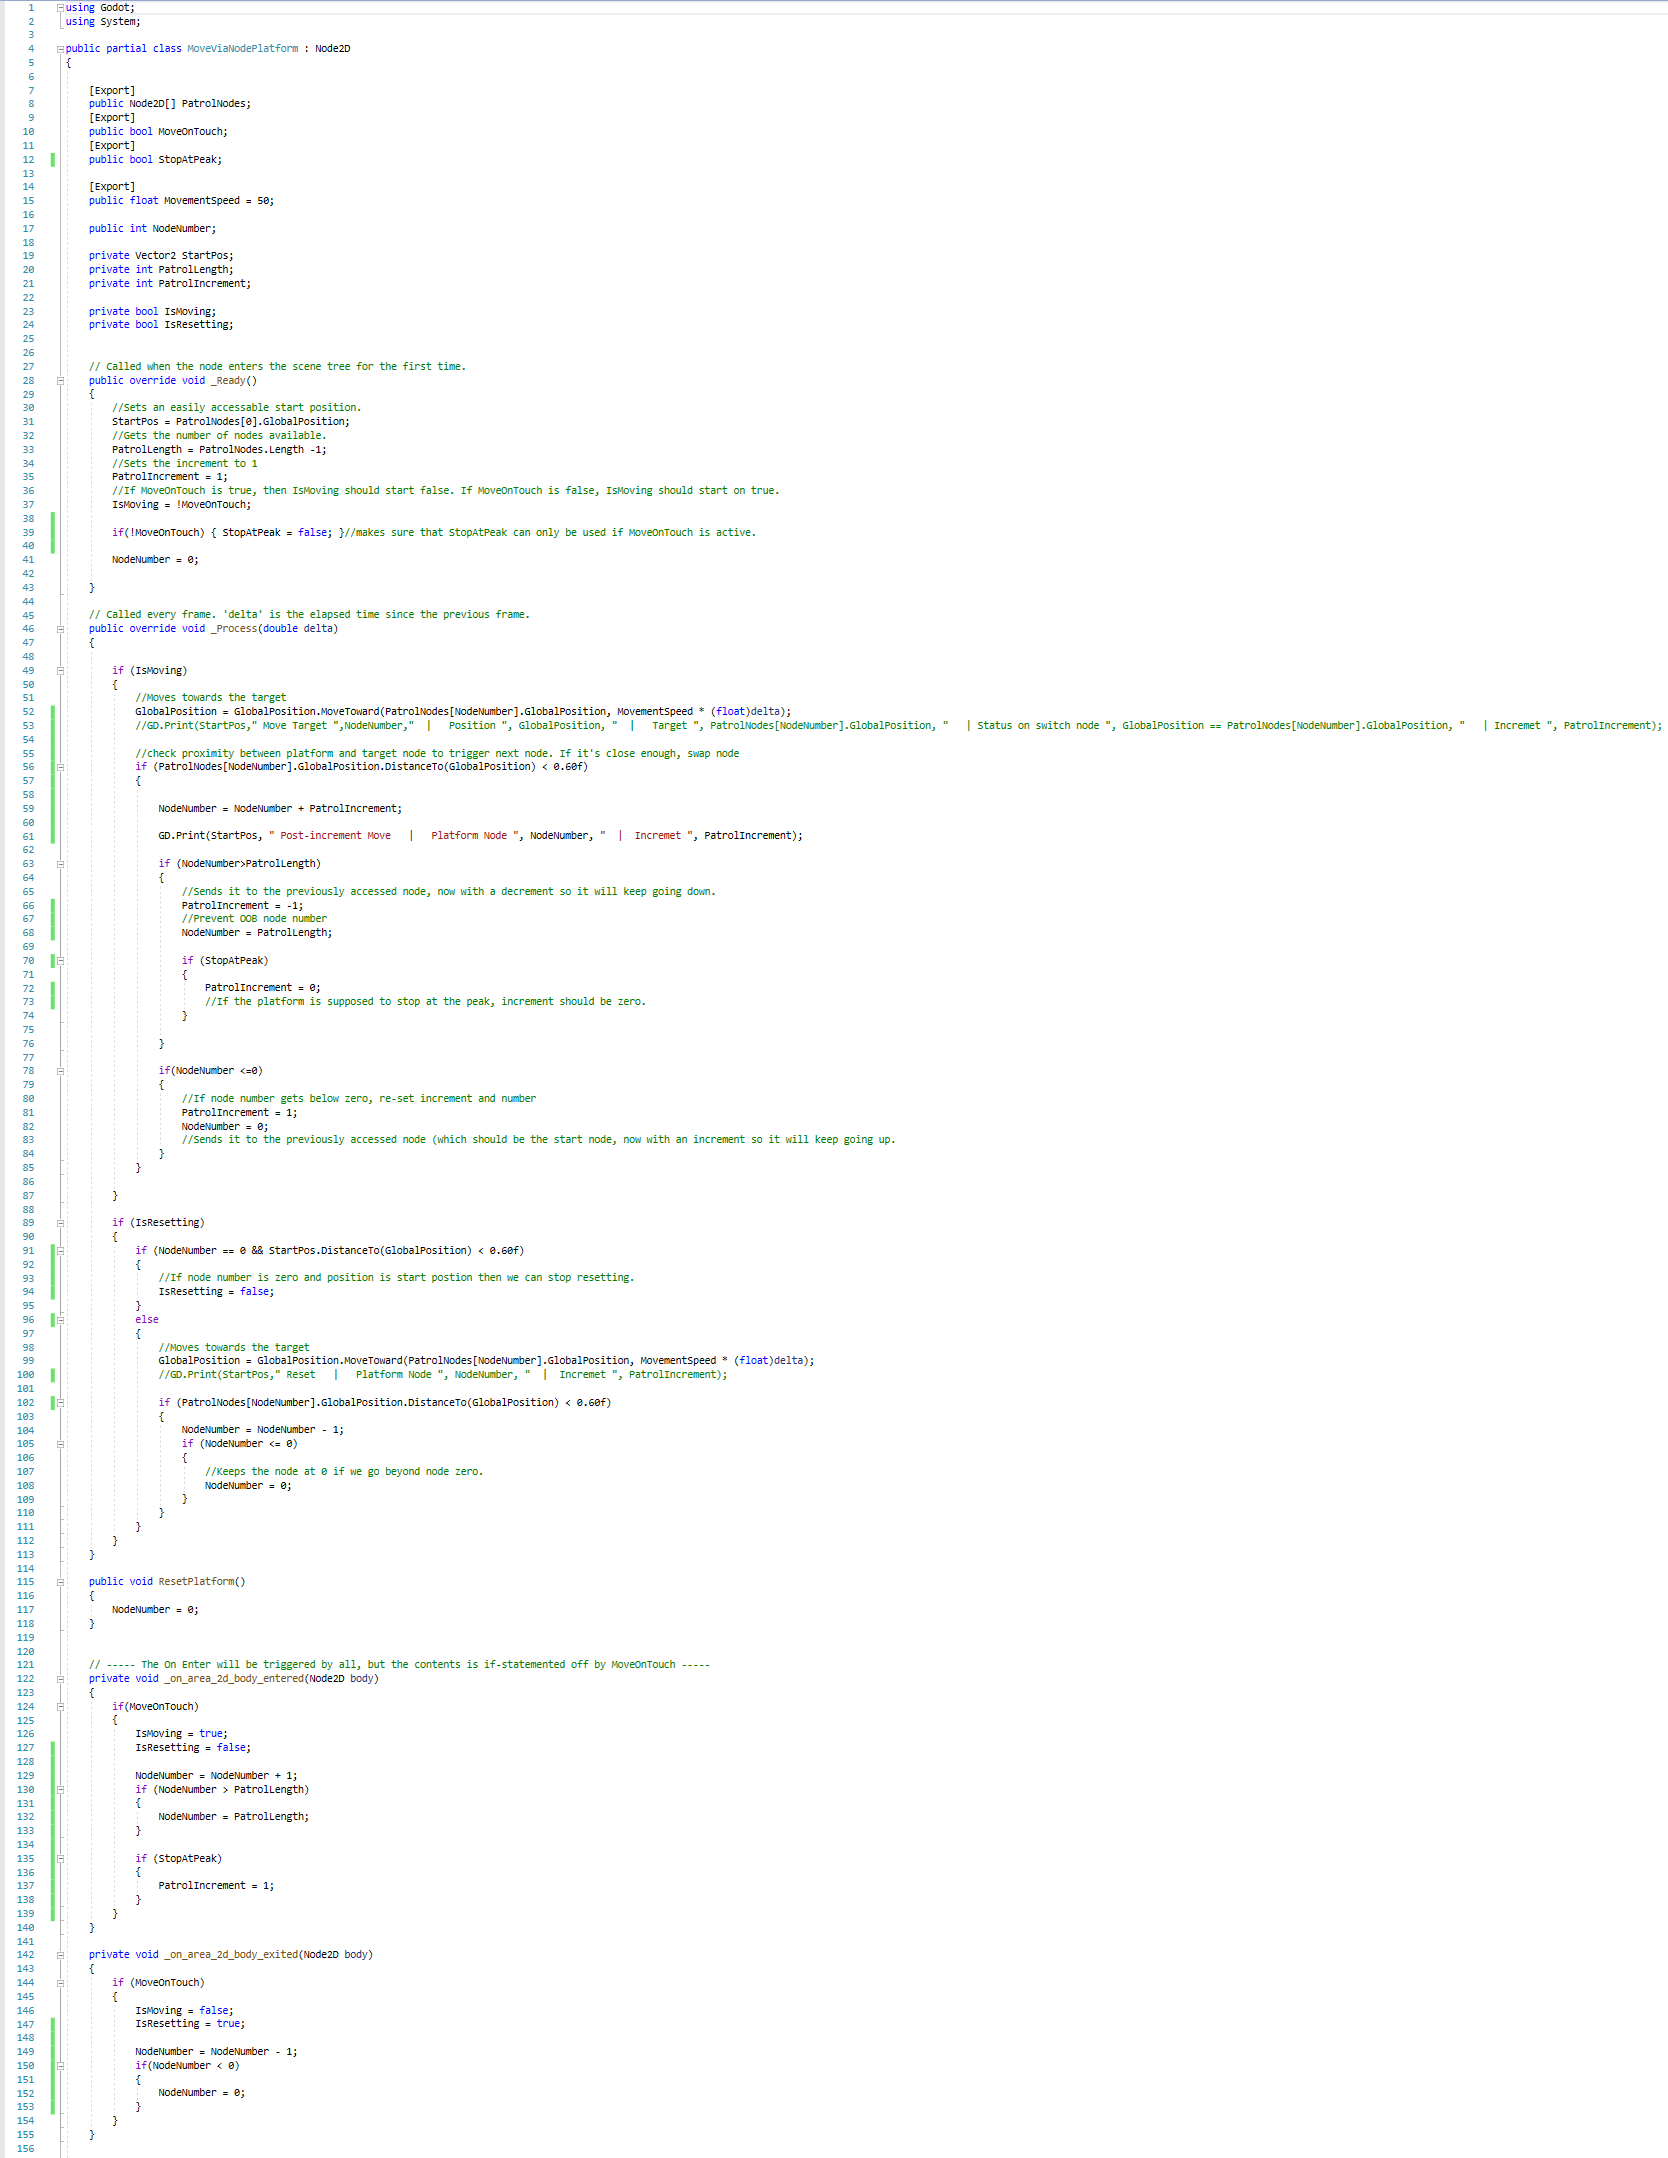
Moving platforms
Moving platforms were one of the big features that I wanted to be carried over from Snow Witch 1 to Snow Witch 2.
Whilst yes, I coud just use animations, I would need a different animation for each unique platform, as some would need to move between two points on a cycle, others would need more nodes to move between, and others are supposed to drop until they hit solid ground. I also wanted them to have different appearances to make it less kaiso-like.
So due to the versatility required of the platforms, I scripted it.
Grabbing the movement from my enemy script, I spent rougly a day bashing together the script for a moving platform that would work.
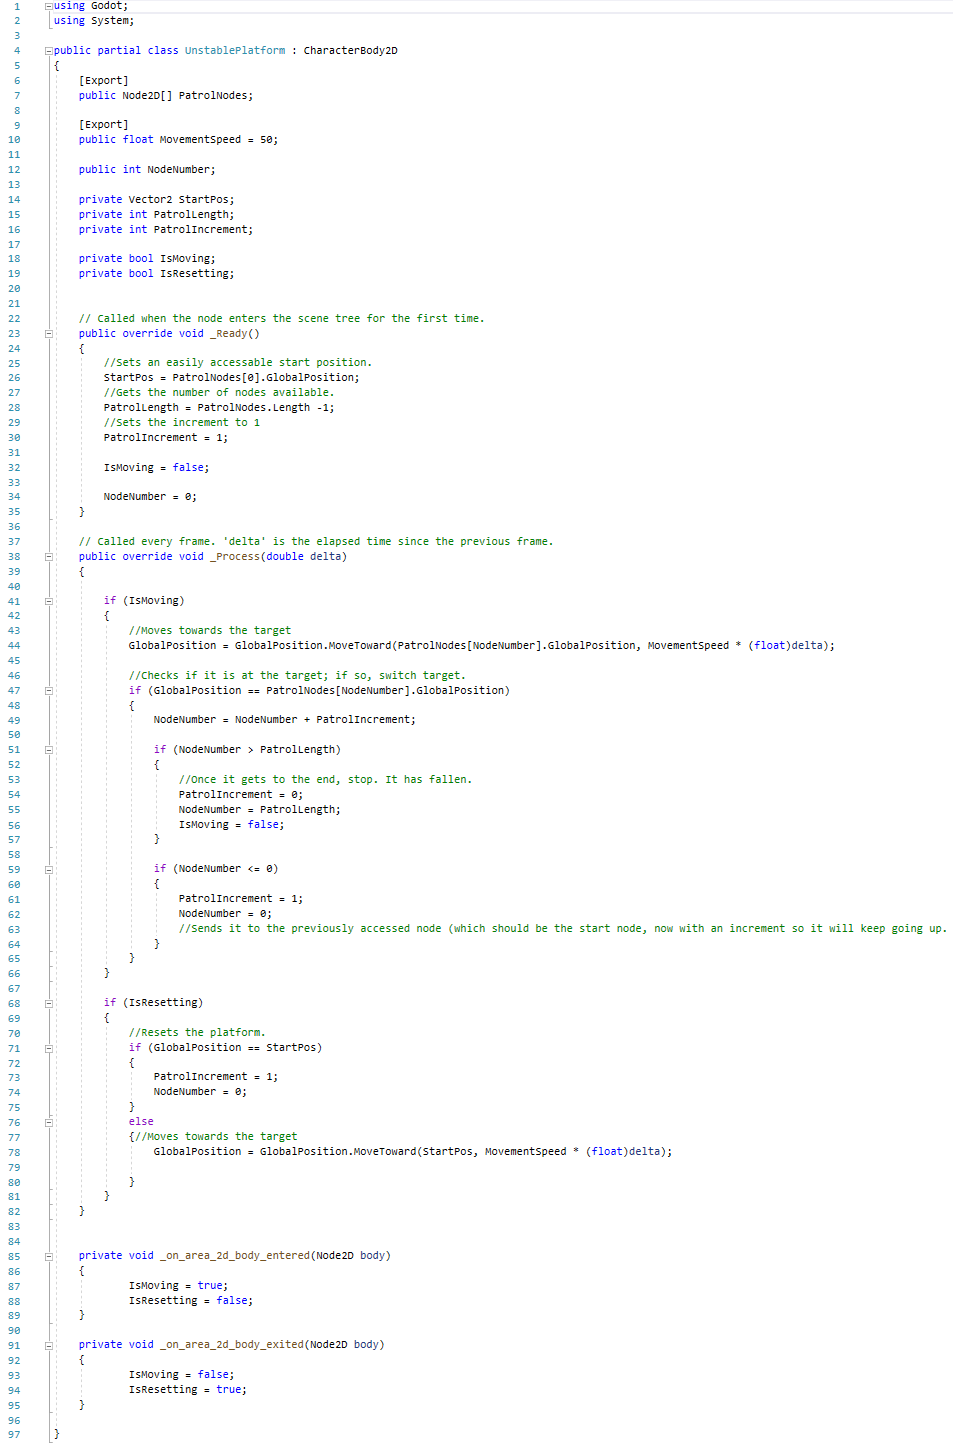
As you'll see later, the moving platform and unstable platform have two different sets of code. This is because the additions to the regular moving platform code would have made the code unnecessarily complex with the number of 'if' statements. Therefore, two scripts was the optimal ammount. Also, because the script is on a child of the platform object's root (so that the code didn't move the nodes AND platform), the scene for them has to be made local for the internal values to be changed. This is great as it adds further versitility, like changing the image used on the unstable platform so it looks like a stable one for when it inevitably gets used to move the player up and remain up whilst the player is on it, as the orange platform graphic is only supposed to denote "will fall DOWN, possibly into a hazard" and not "you can safely stay on this" like the white graphic does.
Here is what the platforms look like:
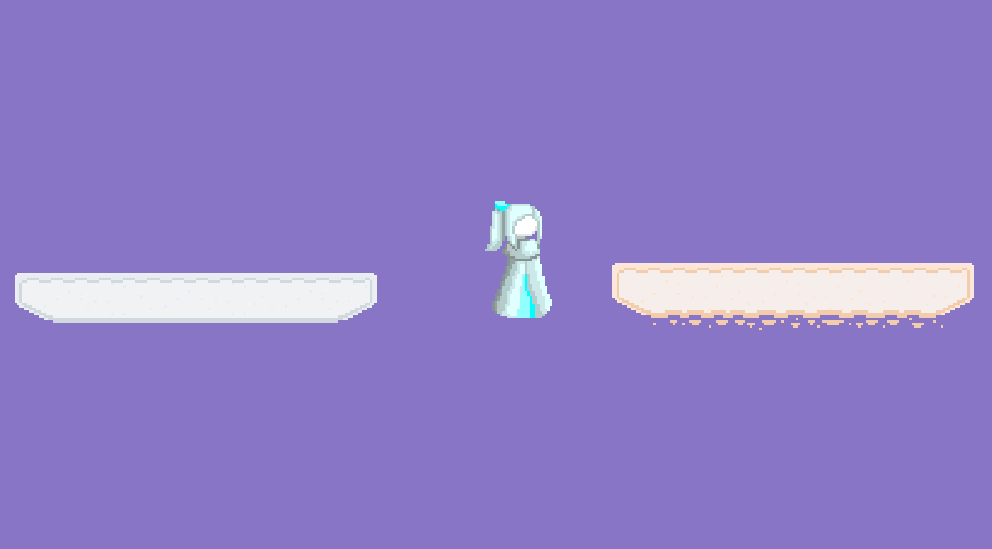
The stable one is the white one, and this one cycles up and down slightly when the player steps on it to get them used to platforms that move when you step on them but are safe (a horisontally moving platform is earlier in the stage just past the first checkpoint, so if you fail that one, you don't go too far back). White was selecetd as it needed to be a different colour, but didn't need to stand out as they are supposed to be as safe as the regular ground unless another hazard is present on the platform.
The unstable one is the orange one, and this first encounter only drops to a floor instead of dumping you onto a hazard, making you have to backtrack a tiny bit to re-try the jump; a far safer introduction than what Snow Witch 1 had. Orange was selected as it is a bold colour and should stand out from the rest of the possible floor colours, unlike my original plan of yellow, which may have been too subtle in some stages and would also result in your typical "yellow snow" jokes. It also looks pretty.
And here is the code:
Moving platform:

Unstable platform:
Animations
Animating the birds and the player was a task that should have been easy, but the new engine made it take longer than it needed to becuase finding all the bits and peices to make it work was a little rough, but that's what learning a new engine is all about.
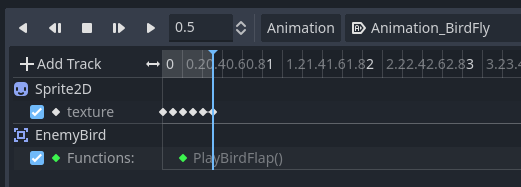
Animating the bird was easy but also rough, as I just needed a fly cycle to run on loop once the game started. The rough bit came in the form of remembering to change the animation length and making sure that the loop button was pressed, and I have to admit that this took me a bit too long, but I did find the "Autoplay on load" button, so code was no longer required for the animation to automaticaly play on start.
Now knowing the animation tool better, the player's four sets of animations were a peice of cake to make. The four animations are her idle animation, moving animation, falling animation, and jumping animation. The jumping animation remixed frames 1 and 2 of the idle animation, as that is where the hair is closest to the head, and the falling animation remixed frames 2 and 3 of the moving animation, as that is where the hair is furthest from the head. This creates the illusion of the hair following physics when jumping and falling, and thanks to my selecetd pixel art style, it is convincing enough.
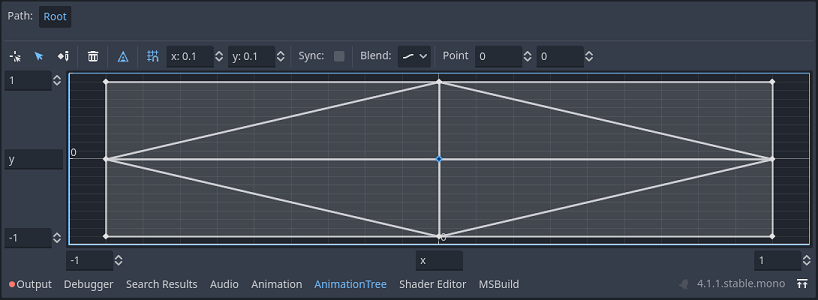
The player's animation tree was a bit tougher by virtue of learning how to operate Godot's blend trees, but using Godot's own tutorial and my own intuition, I figured out that I needed to use an AnimationNodeBlendSpace2D, and from there, adding the nodes for the player's animations was easy.
The code was a slight nuisance, as finding a suitable spot for the code to send the velocity to the blend tree took some minor trial and error, but the code itself was quite simple, and I only needed to add two lines of code to the player script:
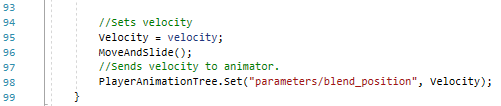
That code above adds a variable for the animation tree to be slotted into, and sends the velocity to that animation tree.
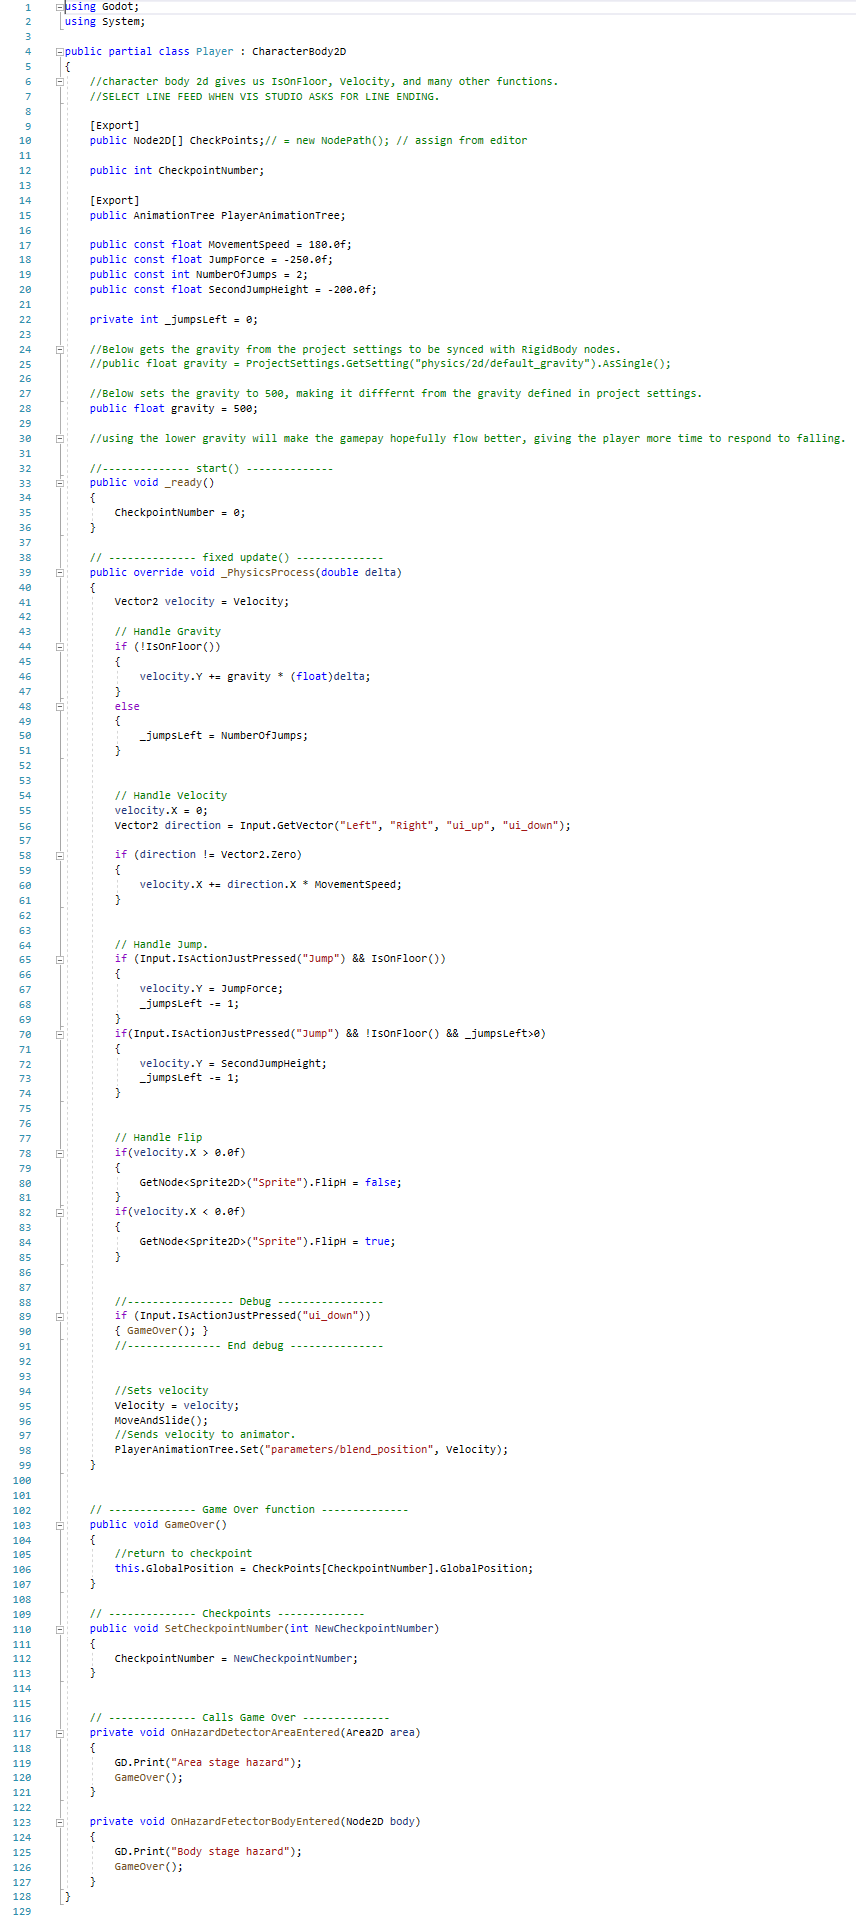
That leaves our player code looking like this now:
I received 9 lots of this perculiar error, but the game does run anyway, opted to shelve this issue for later as I figured it'd be safer to tackle it once I figured out what was going on than try and take it on when I don't know what is going on, because the latter is a recipe for things just getting worse.
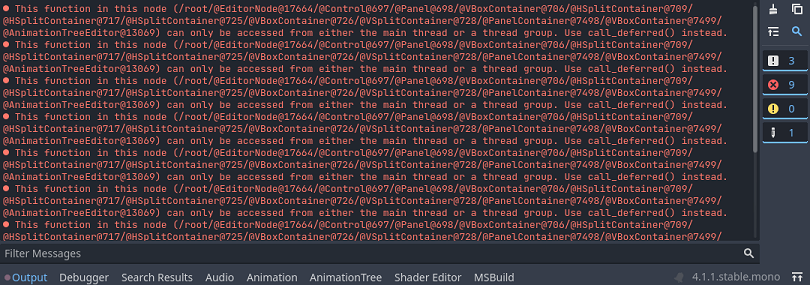
Later arrived, and upon opening the project and running the game, the errors did not appear. This is similar to a specific set of errors that I encountered when working in Unity where the console displayed an error because I edited code when it wasn't exactly ready for me to edit code.
Now I know that there is an error that can be solved by just re-starting the editor that I need to be aware of.
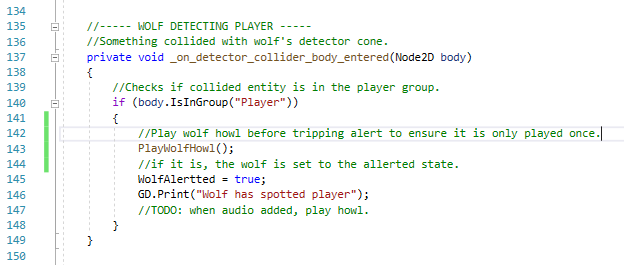
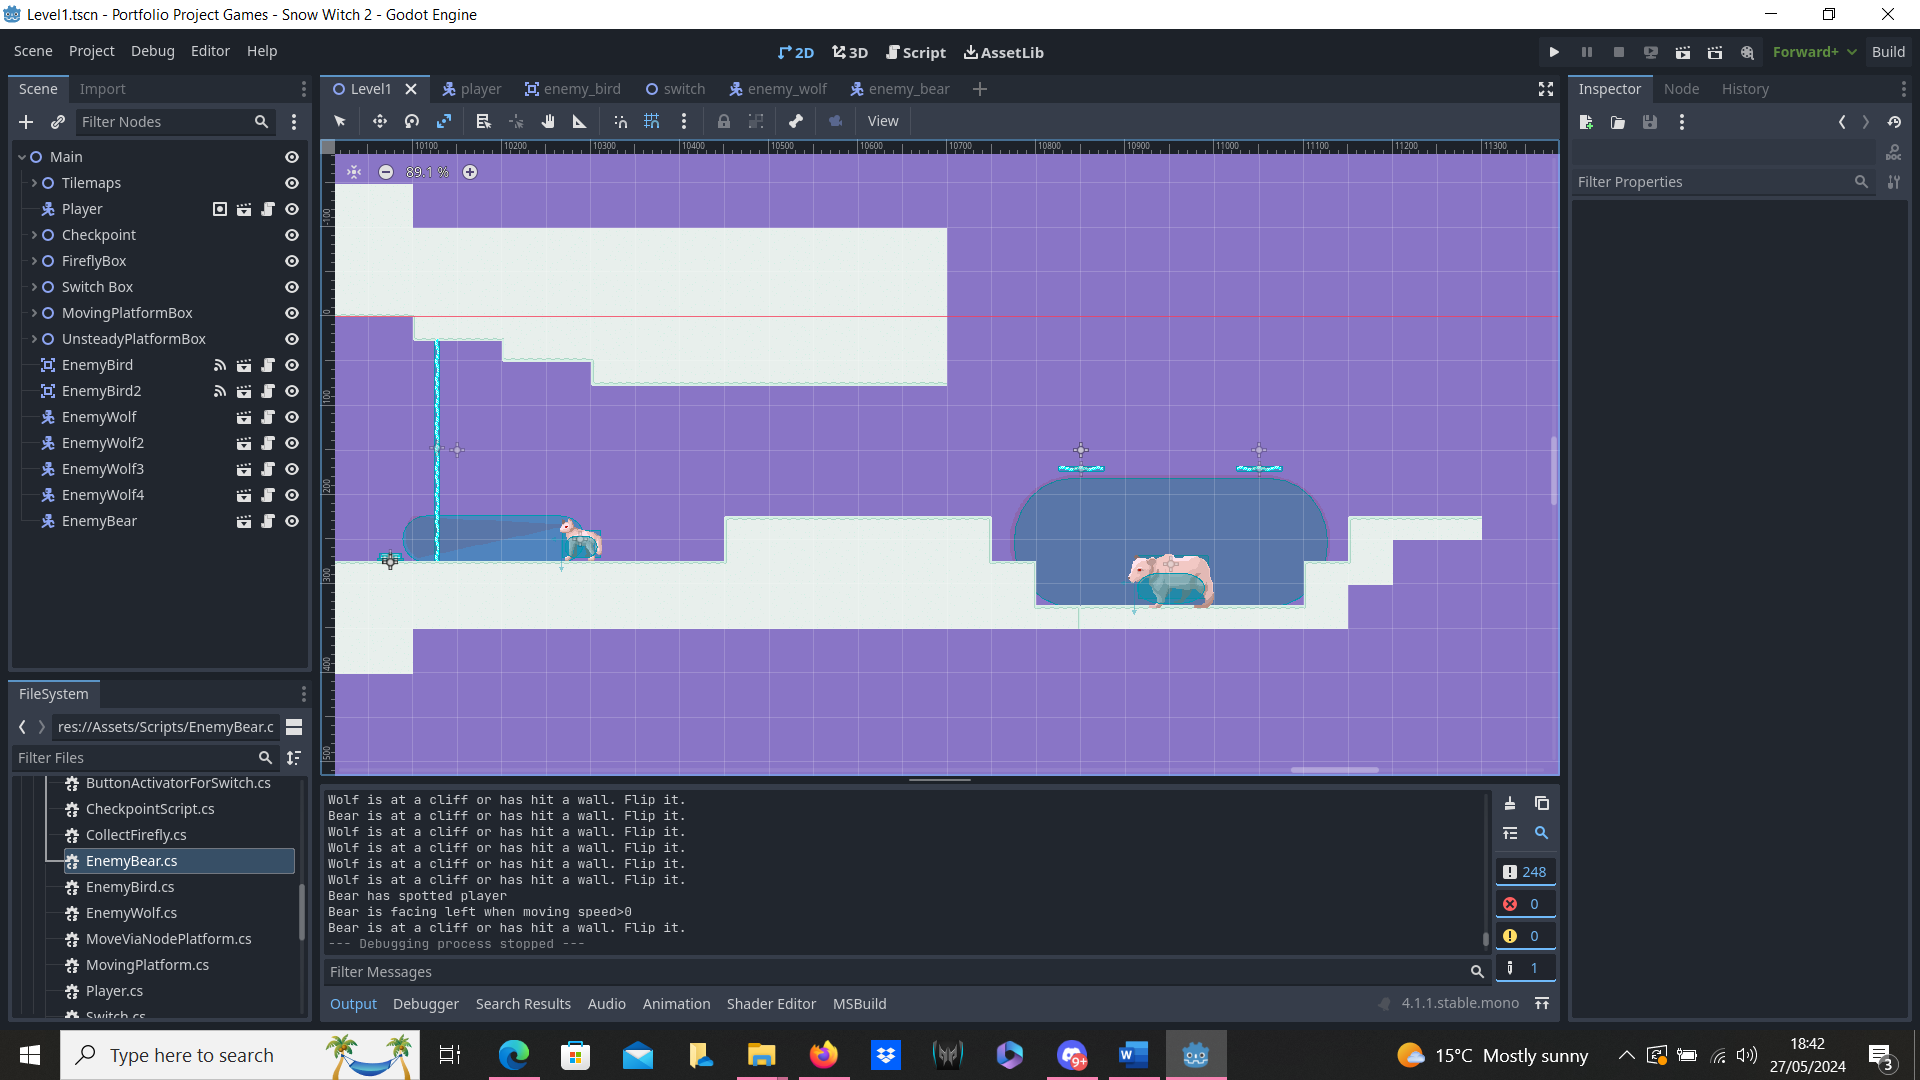
Creating the wolf
It's time to port over the first enemy from Snow Witch: The wolf.
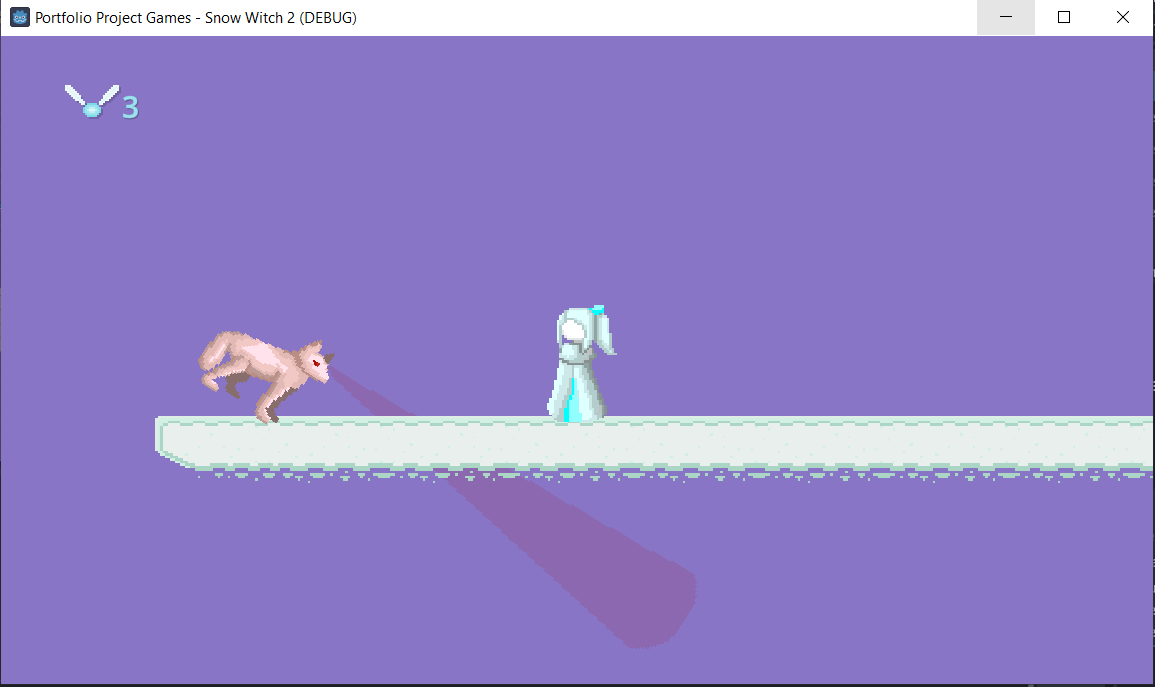
The wolf is a simple enemy, patrolling a stretch of ground. It turns around if it hits a wall or drop, and will begin to pursue the player if the player gets detected.
But let me tell you, coding the wolf was far from simple.
The wolf was intialy created as a Node2D, but due to how Godot works, I later converted it to a CharacterBody2D when I added the movement code as CharacterBody2D had some functions that I wanted for making the wolf walk and detect if it was on ground (useful for making sure that gravity effects them corectly now for when I stick them on moving platforms later), resulting in me making the animations twice because they broke when moving it and the other child nodes to a new root node.
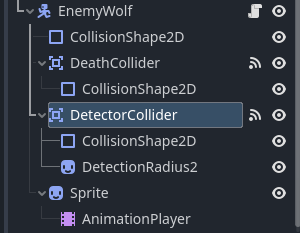
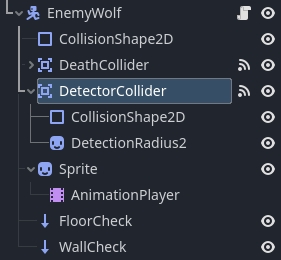
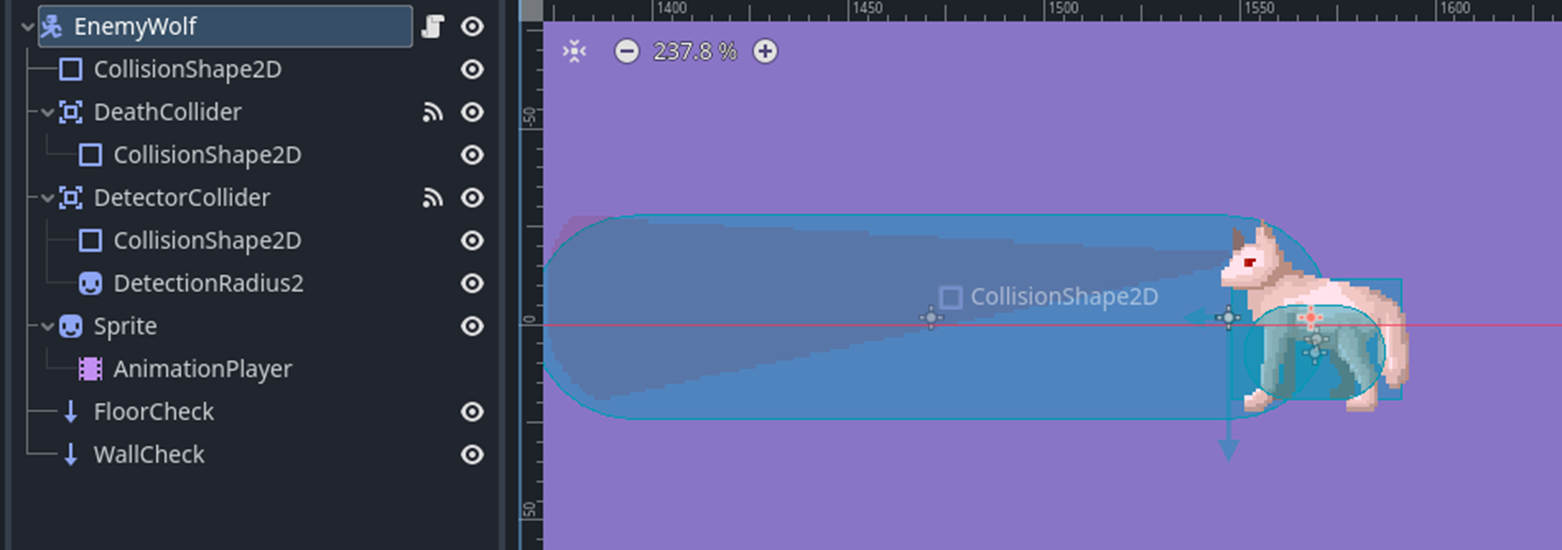
Prior to adding the code to solve the wolf being able to detect if it needs to flip, the node tree for the wolf looks like this:
And the code looked like this:
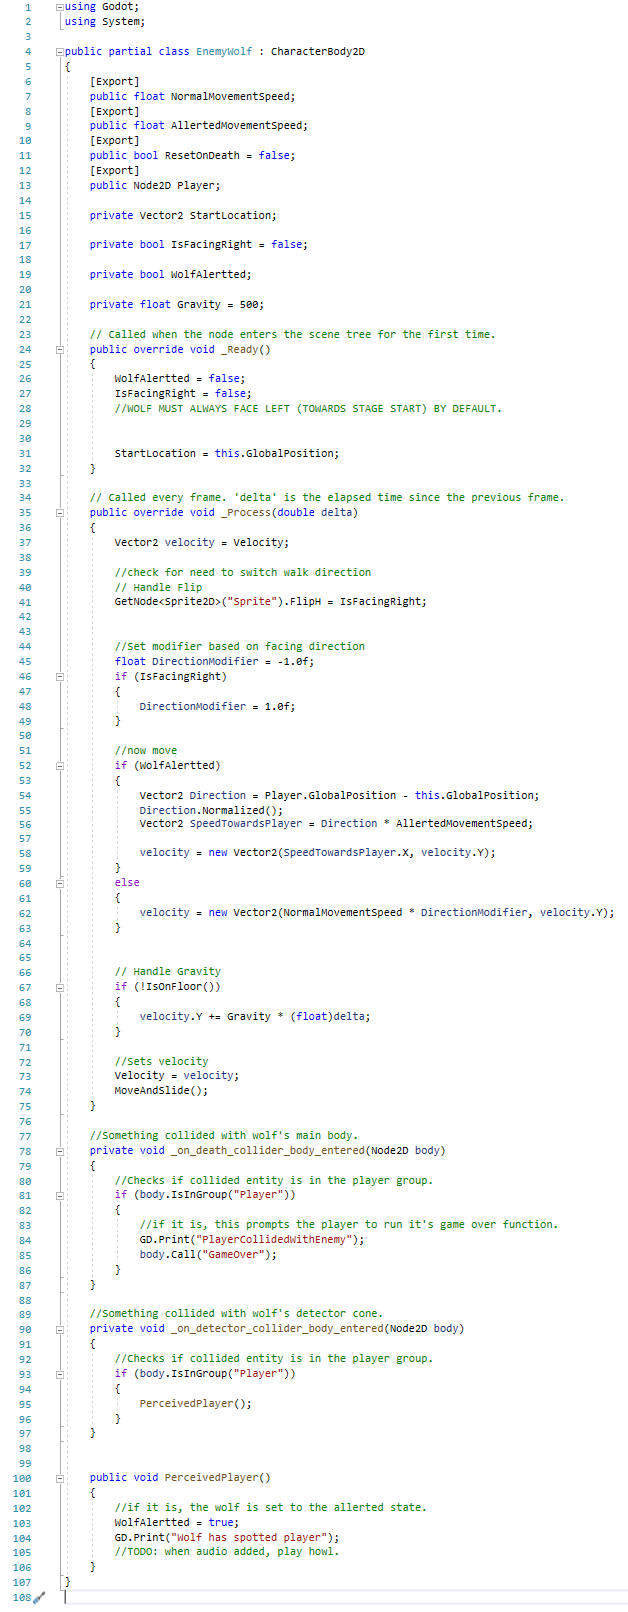
Practicaly all of this code was created by making use of the wolf controller code from Snow Witch 1 to get the right variables and rough order of what needs to be done where, and re-using segments of the Snow Witch 2 player controller to quickly convert what I took from my Snow Witch 1 code from Unity C# to Godot C#. Many phantom errors were caused, but attempting to run the project removed them and let me see the real errors that remained, which were mostly code translation issues in regards to capitalisation of .X and .Y for Vector2 components, and the fact that Godot's normalise vector function is ".Normalized()" instead of ".Normalize()", with the latter in godot being reserved for a string function.
Whilst making the wolf script, I figured that it was finaly time to remove the debug statement that I used to test the game over function and comb through the rest of the code to make sure that the variables all followed the same case structure.
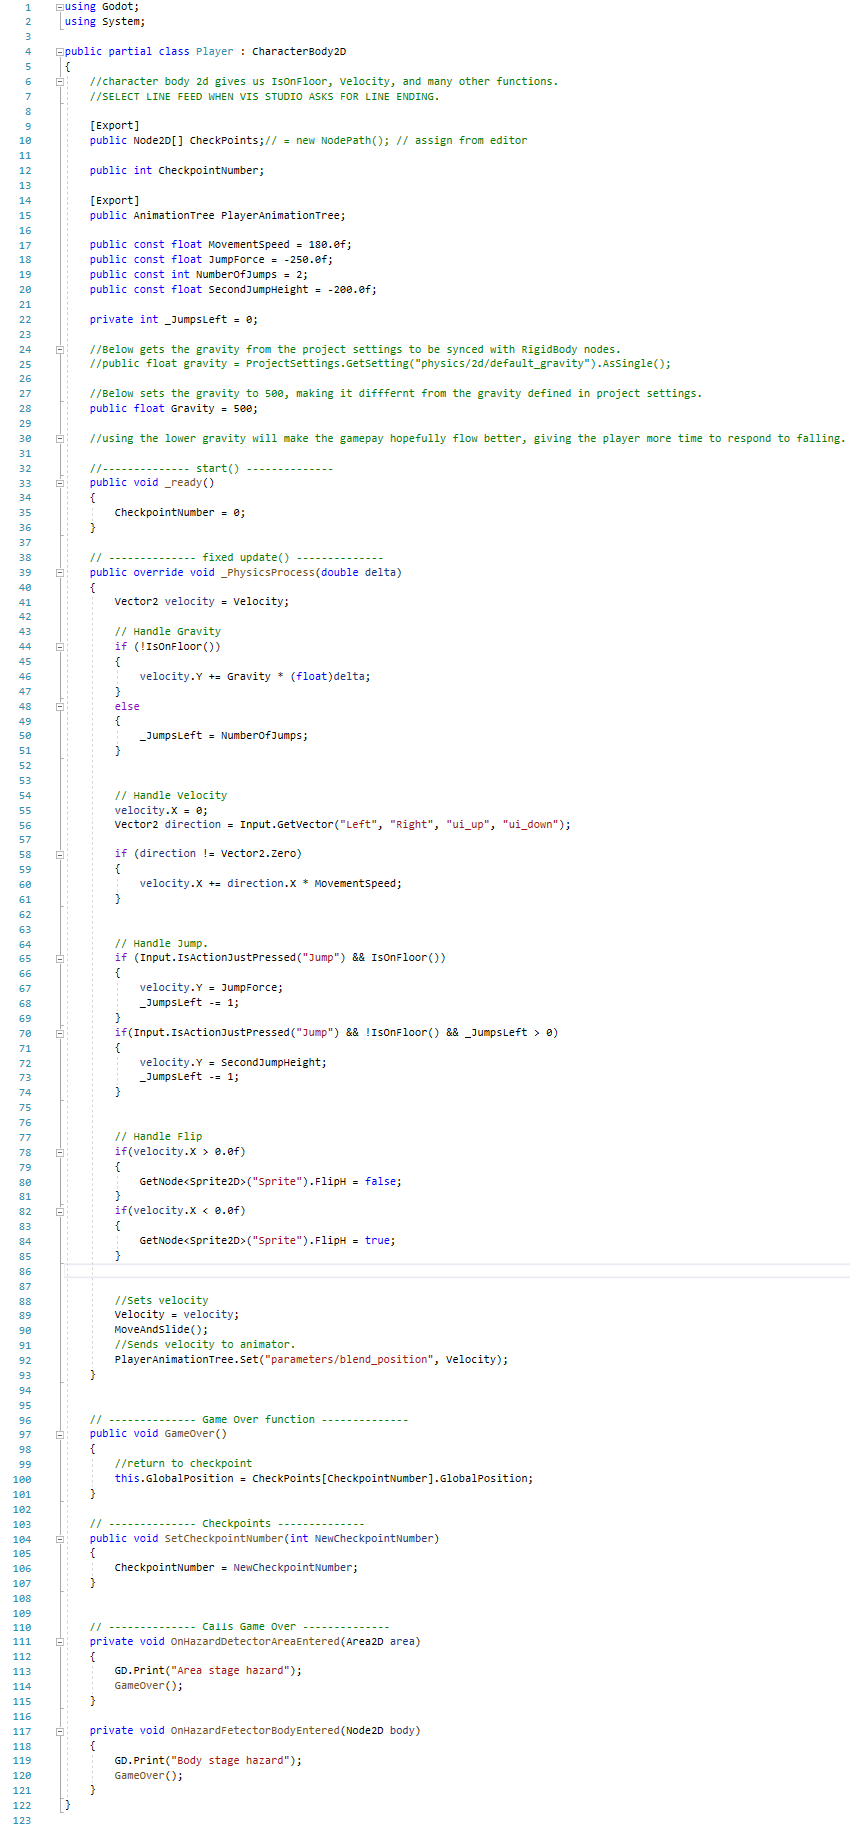
This is what the player script looks like after everything:
The next step is to add the wall and gap detection to the wolves.
In trying to find a solution, I have encountered some new issues: multiplying X scale by -1 also effects the Y axis for some reason even though I had already turned the link scale X and Y option off, and going from moving at 100 speed to 150 x normalised direction towards player means that it moves so fast that it teleports past the player. Ignoring the speed issue for now and disabling the movement, I went to test what was going on with the flip command.
I set the flip command up to set the wolf's scale and stick that way, and added a debug command to run the flip function. It flips between the Y being positive and negative, despite the code saying to set the scale directly to -2, 0.5. What's going on is very telling here, as the only axis that is negative in the code is the X axis, but the debug output shows that the Y axis is the one being modified by the negative sign in its stead, but only the negative sign part and not the numerical part of the value, as the silly stretch I set up remains on its correct axis.
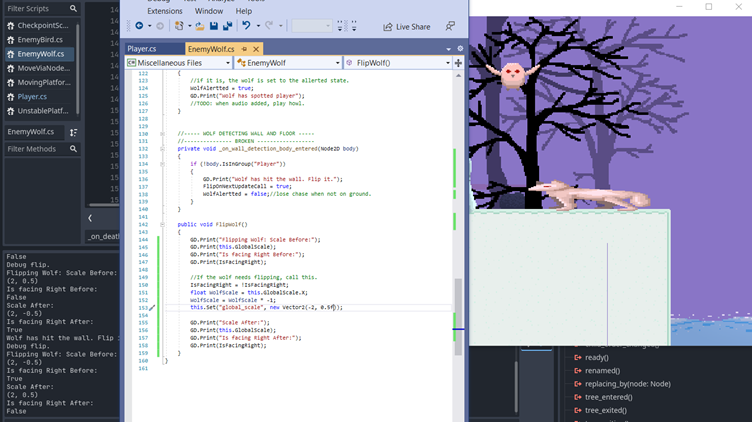
Just found out that Godot just flat-out doesn't support negative X as a scale.
So I went and found out how I'm supposed to flip something on the X axis, and you need to flip it on the X and rotate it 180 degrees.
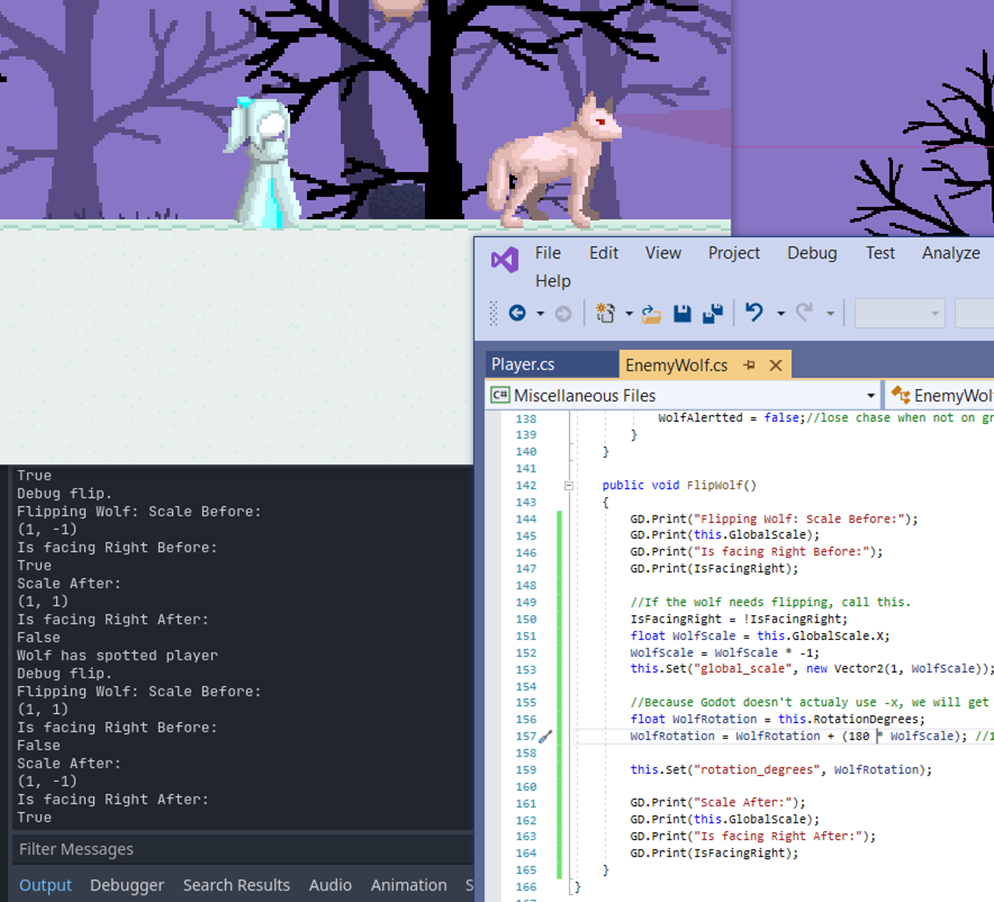
It works, but I am not too happy about it.
But now that it no longer turns itself upside-down, I can work on its movement and scenery detection again.
For the scenery detection, I found that it was more efficient to use raycasts for the wall and floor detection, and after turning off the layer masks in the detector cone to test this without the movement speeding up or slowing down, I found that it works as intended.
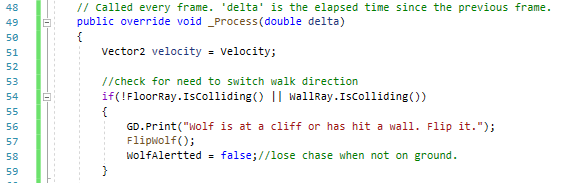
This isolates our remaining issues with the wolf to the code that makes it chase the player.
My solution for the wolf becoming quantum when it sees the player is to change how the velocity is calculated. Instead of its movement speed being based around the normalised distance, it instead just uses the normalised distance to set the direction modifier to either 1 or -1. It worked so I immediately tried to cut out the middleman and used Direction.X as it should be between -1 and +1 after the normalisation. It turned out that using “Direction” is what made it act strange because unlike in Unity, the value does not stay normalised. Learning this, I used Direction.Normalized().X in place of DirectionModifier and it worked as intended, and so the jump-tech (the technique where the player can jump over a wolf and live) survives to the Godot port! Also, it saved several lines of code.
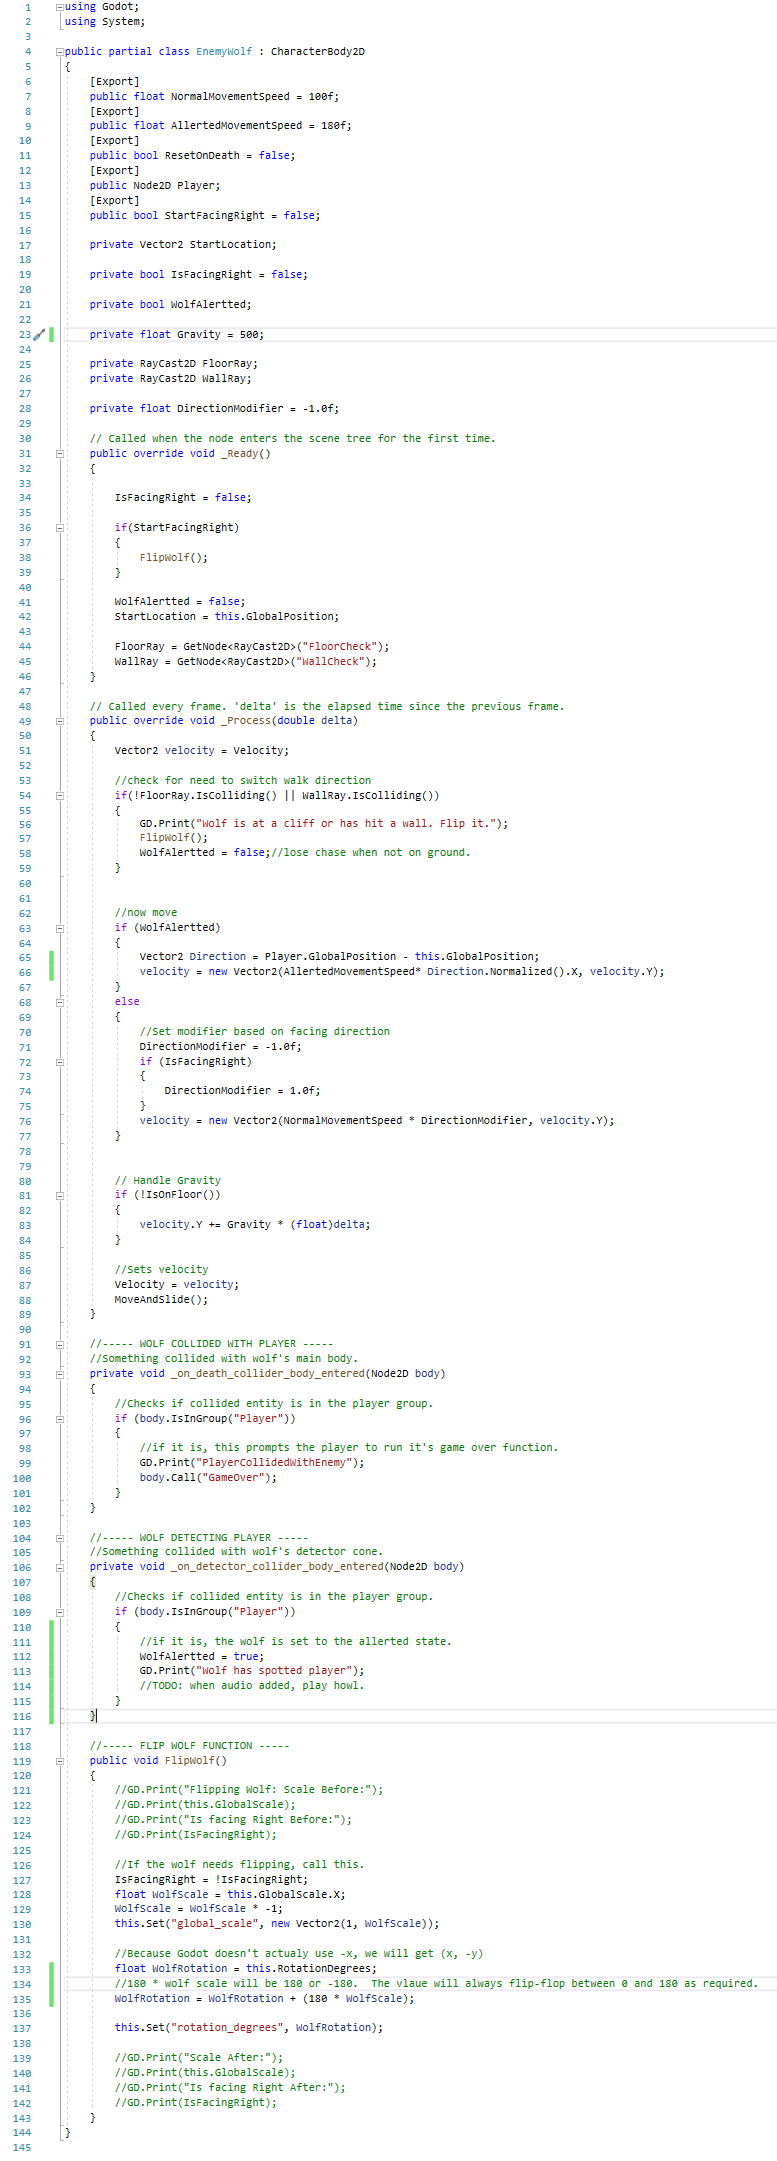
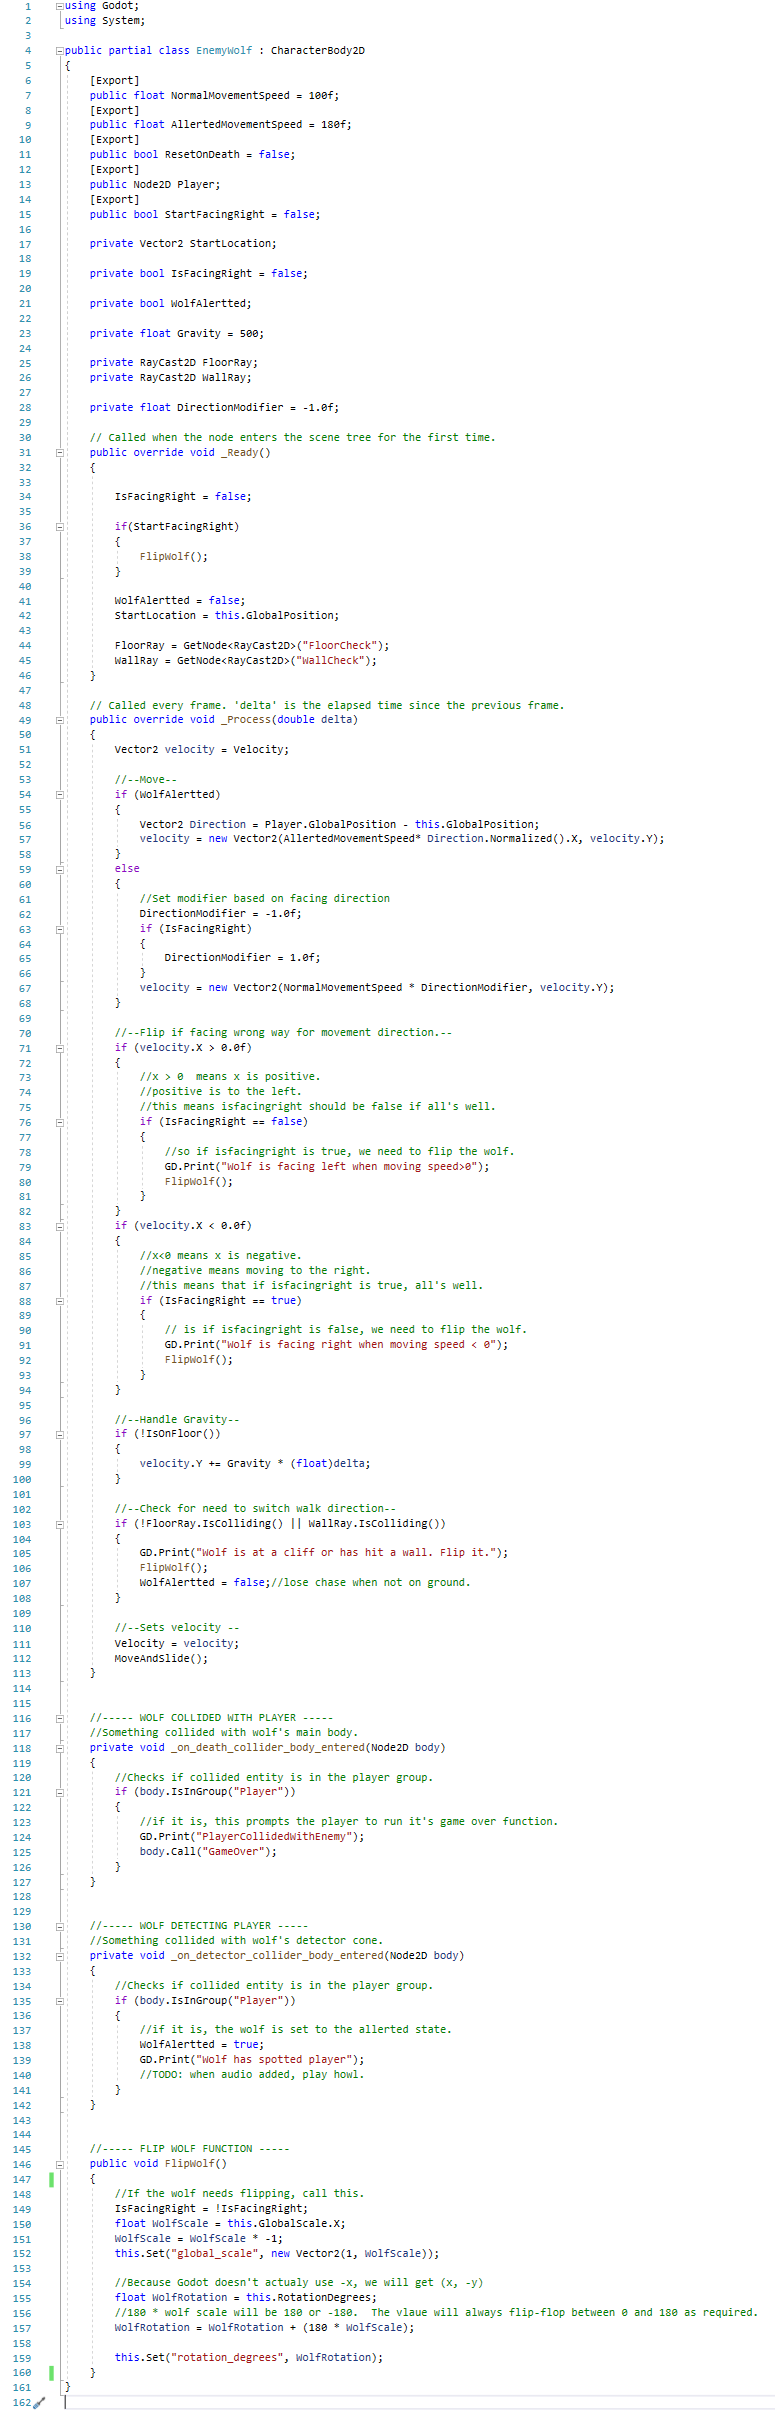
Here's the wolf script as it stands so you can see where all the fixes actualy fall into place. You can see my solution for the allerted wolf code at lines 65 and 66.
The next step was making the wolf flip if its velocity is the opposite of its facing direction. I found that the code I created for this purpose for Snow Witch 1 translated over practically perfectly, only requiring the obvious variable name changes to fit the new variable names. I also opted to re-order the _Process() function so it flows better.
After that final peice of implementation, I was able to turn the wolf into a scene (the godot equivalent of a prefab) and now I can add wolves to my stages with ease.
This is the wolf:
This is the final script:
Fireflies: Snow Witch's coin equivalent
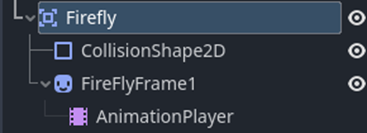
To start the fireflies, I set up the basics and a basic code shell based on my Snow Witch 1 code.
Then, I decided to make use of the tutorial I mentioned in the about section again (I purchased it, I'm going to use it) to add some extra flair to the fireflies in the form of the firefly oscilating up and down on a sine wave. Due to the differences between Godot Script and C#, I had to make major alterations to the code to make it function, but it did work all the same in the end.
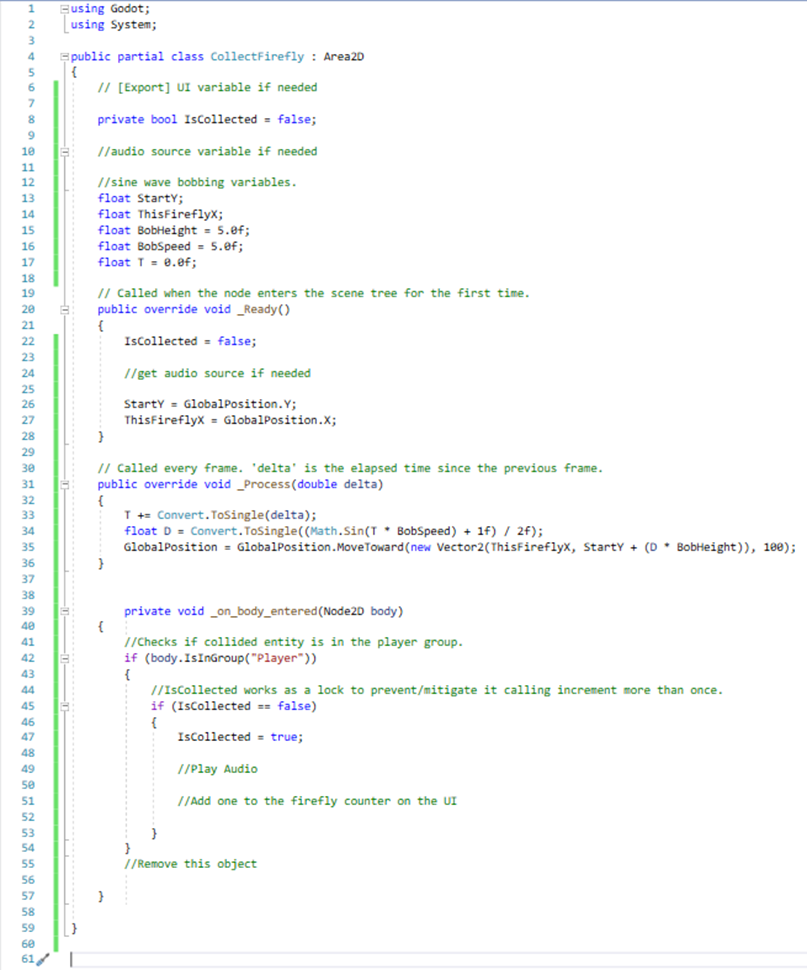
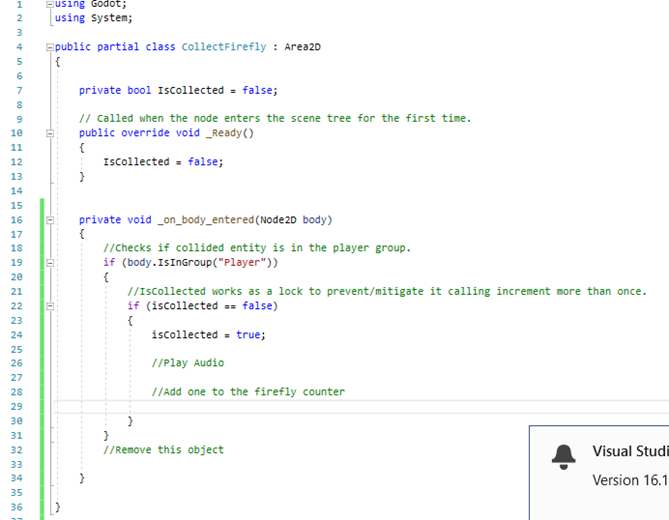
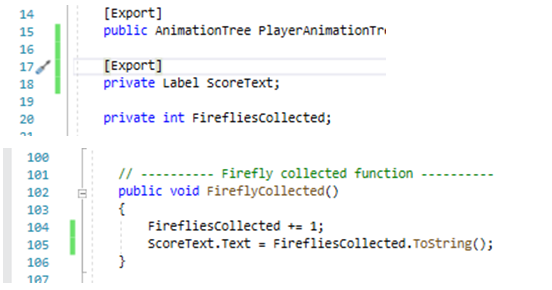
Now that the firefly bobs up and down, the next stop is actualy filling out those comments I left; making a UI to display and manage the score and the firefly removing itself.
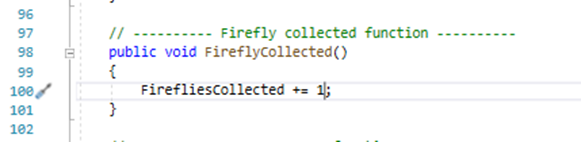
As I am not at the audio stage yet, the last comment to fill out was the object deleting itself so it may be collected. This also involved adding a small function and variable to the player script so that it logs how many fireflies were collected.
The Firefly code now looks like this:
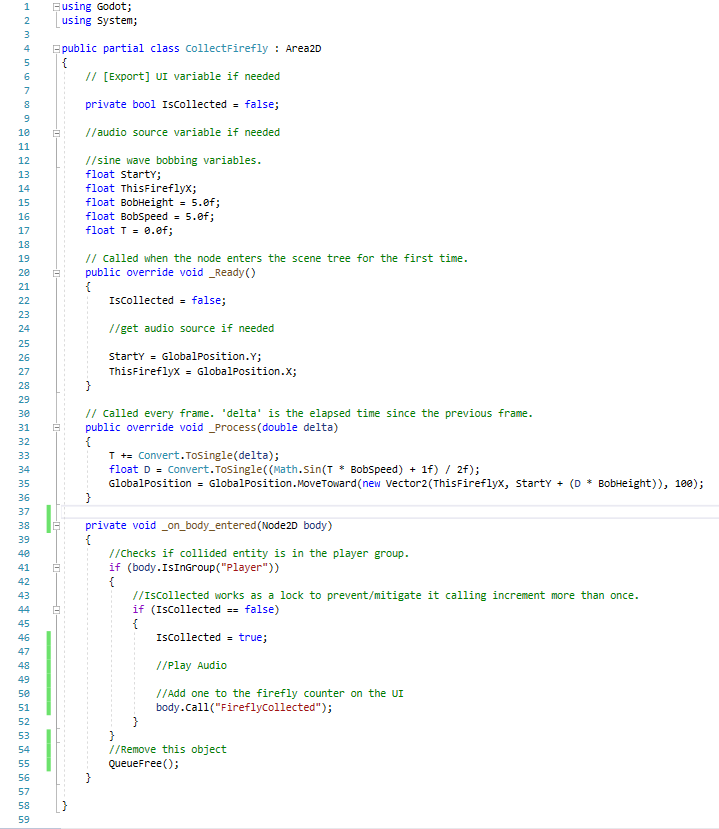
And here's the player script's new function:
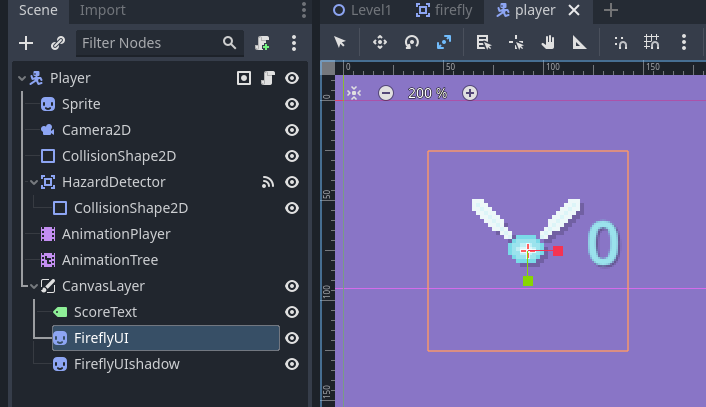
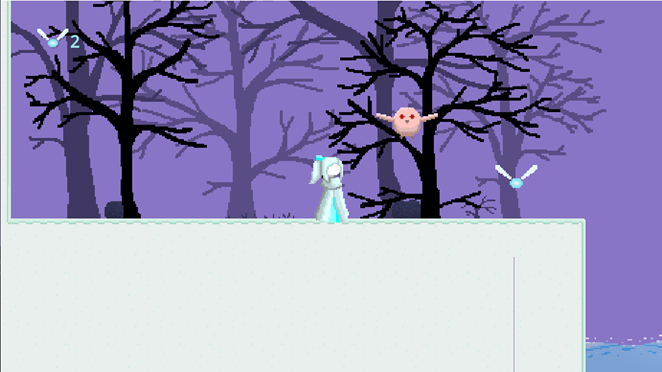
The next step was to add UI to the player. All I needed was some text and two lots of the firefly sprite because to add a shadow to it, I need a second one to be modulated to a transparent black to act as the shadow.
With the UI in place, the last thing to do was to get the UI to update when a firefly was collected. This required some small changes to the code, so I'll only include the changes, but with these changes, the fireflies now also tally up the score counter.
And that's the fireflies coded bar the audio.
Audio
Seeing as most things from here on out and most things I've already implemented will require audio, I figured I'd set up some sounds on the objects we currently have in play, starting with the player.
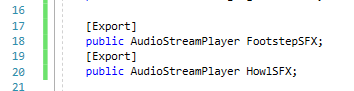
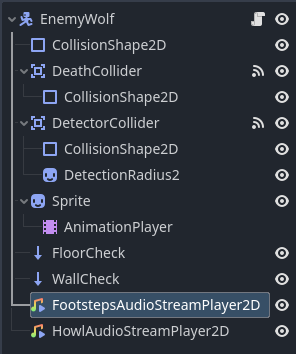
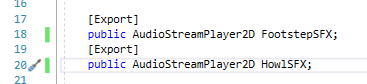
First thing first, the player has to have access to the sound effects to play them:

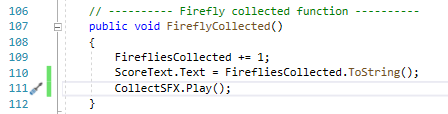
The first and easiest sound effect to add was the firefly collection sound effect becuase the logistics of only running the collect call once has already been handled, so inserting a call for the sound effect to be played was simple.
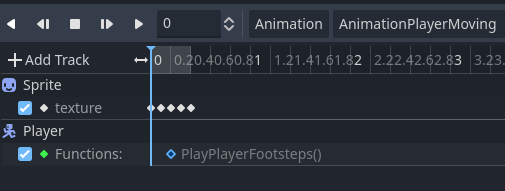
With the firefly collection sound playing, the next step was to give the player footsteps. This was done in the animation player by creating a function and adding an animation track to the moving animation.
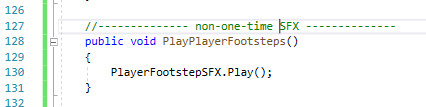
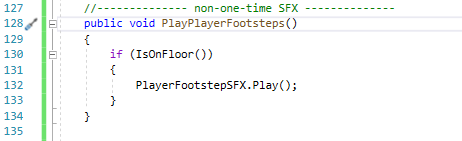
This functions OK, but leaves the edge case of the player being in the air and using the moving animaion still at large, and for that, there is a simple fix: making sure the sound only plays if the player is on the ground.
This makes the footsteps feel more imersive, and now asside from switching out the audio clips for better ones, the player's audio outputs are complete.
The wolf was next. Setup with the scene and scripts was quick.

Because the wolf doesn't already have any sort of lock in place that ensures alert is only set to true once upon the detect box colliding with the player (what's it going to do, set it to be more true?), that was handled by the audio call function itself and by having it run just before the switch is flipped to true, so once it has executed the collision code once, further player collisions in the colliders detected list will not trigger the howl SFX until the alert flag has been set to false.
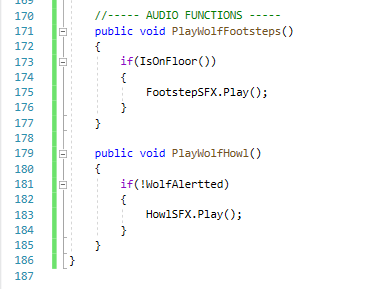
And last thing was to implement the footsteps.
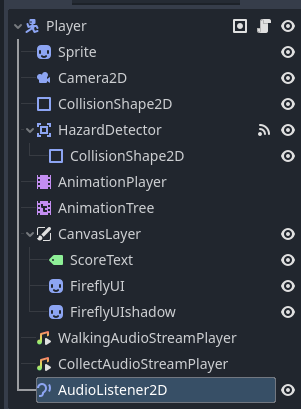
With that in place comes the next part: making the audio only capable of being heard when nearby.
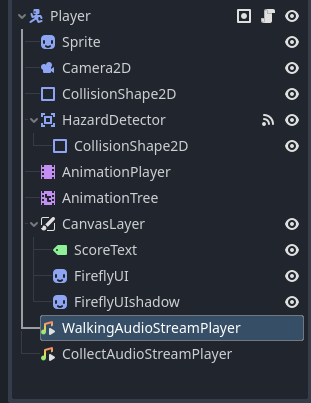
Added an audio listener to the player.
Swapped the AudioStreamPlayers on the wolf for AudioStreamPlayer2D and altered the wolf script accordingly. The sounds on the player don't need changing as they will always play on the player's location.
And with that simple fix and the tweaking of the maximum attenuation distance values, the wolf's footsteps and howl has distance attenuation.
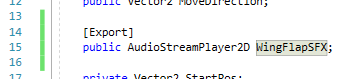
The bird was the last thing needed before everything so far has audio attached (asside from background music). I used https://sfxr.me/ to make the bird's sound effect, and added it to an AudioStreamPlayer2D node.

Then I added the required code.
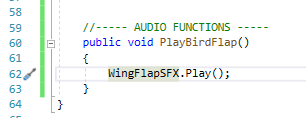
And put it in the animation as a function call track.
And with some tweaking to the attenuation settings, I was happy with it.
Switches
The next object I made was a toss-up between switches and pushable blocks. I went for switches.
The most managable bit was the node tree:
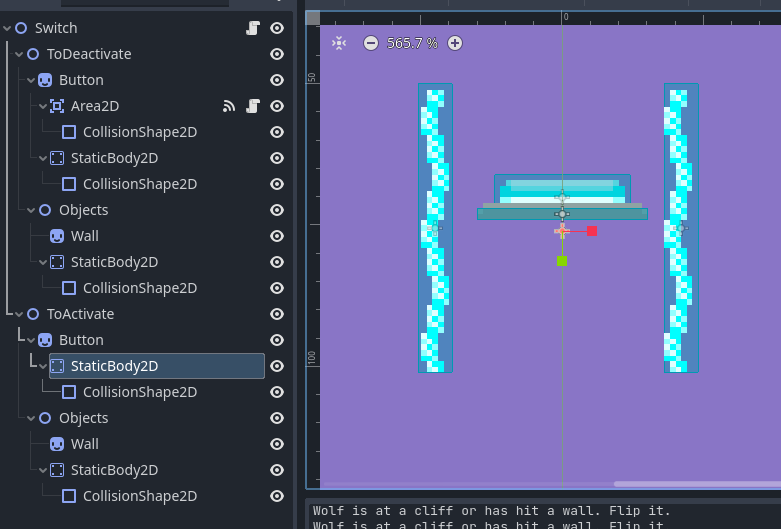
This sets up the switch in its two forms and what objects it'll be bring in and out of existance. Each switch will need to be made local to the scene it is in.
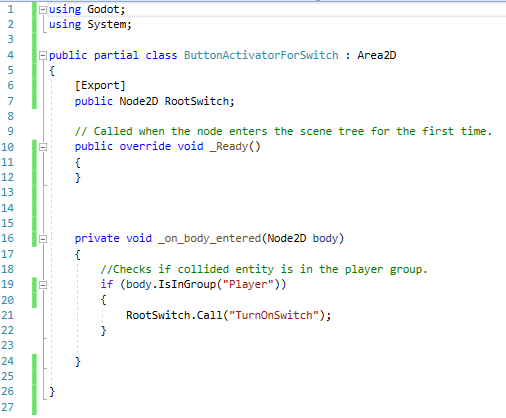
The annoying part was the code that activates and deactivates the objects the switch activates and deactivates. Whilst the baseline was easy, the hard bit was finding out what I needed to call not only to hide the switch, but also stop the object from colliding with other objects. Namely the player.
whilst SwitchObjectsToActivate.Hide(); and SwitchObjectsToDeactivate.Show(); worked for toggling the visibility, they didn't properly deactivate the nodes, so I had to find a second deactivate command that would do the job. That came in the form of SwitchObjectsToActivate.ProcessMode = Node.ProcessModeEnum.Disabled; and SwitchObjectsToDeactivate.ProcessMode = Node.ProcessModeEnum.Inherit;.
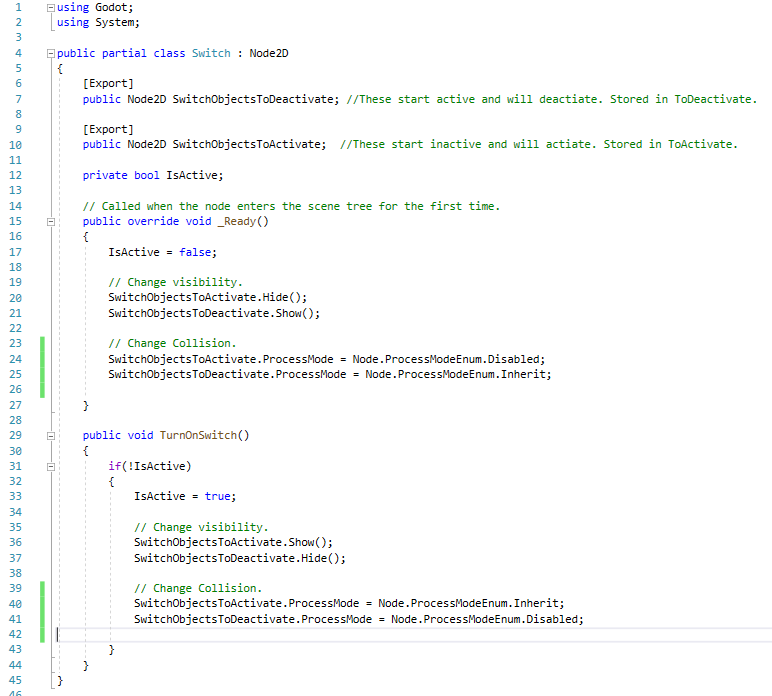
However, this does leave a nasty error as it will deactivate the nodes stored in "SwitchObjectsToDeactivate" mid-physics process.
The next step was fixing the error. To do this, I rigged it up so _PhysicsProcess would run the function that actvates the switch. It required moving the contents of TurnOnSwitch() to a new function, as TurnOnSwitch now held a single line of code that just sets the flag the _PhysicsProcess uses to determine if it needs to run the activation function or not, but it works and doesn't give the error anymore when the switch is activated.
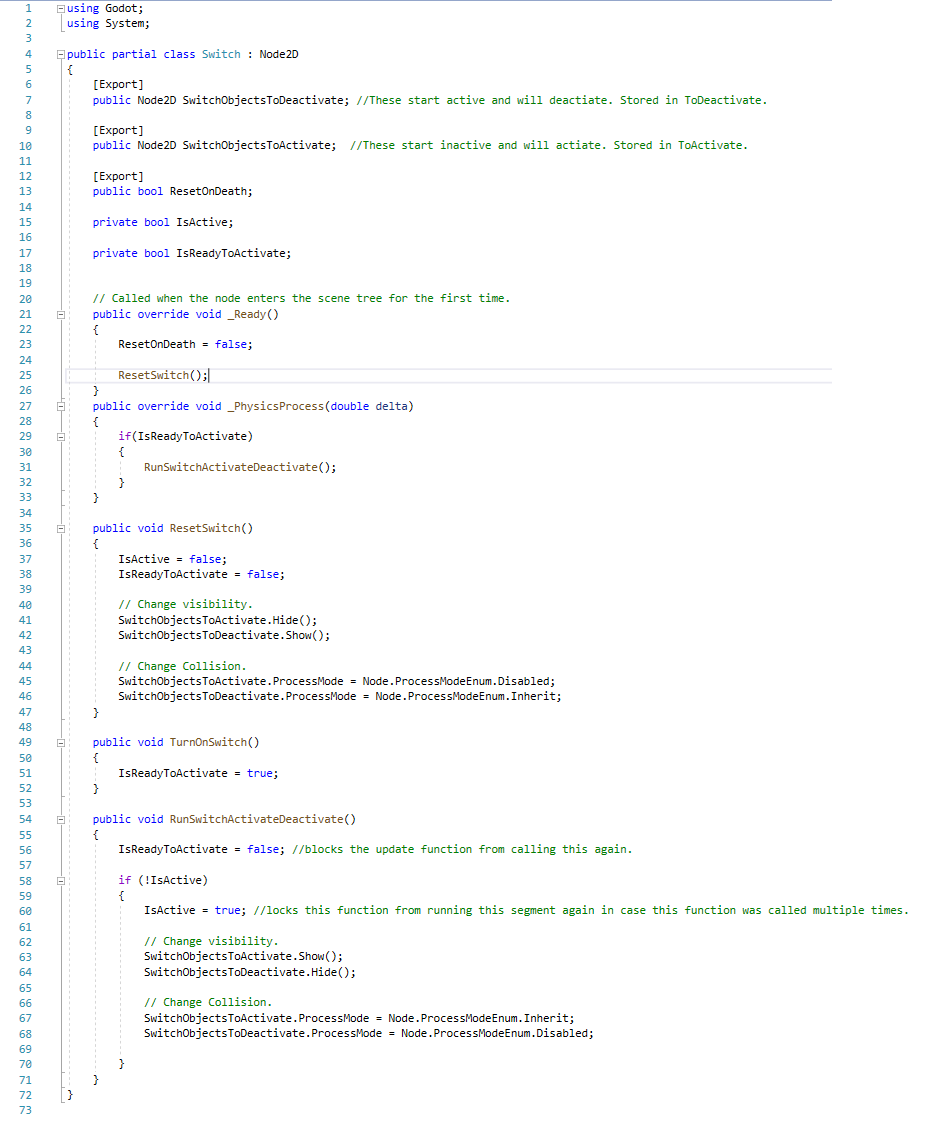
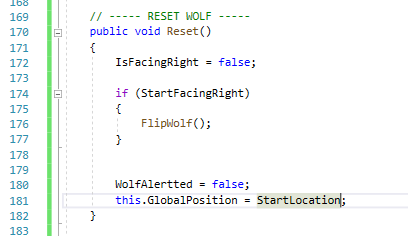
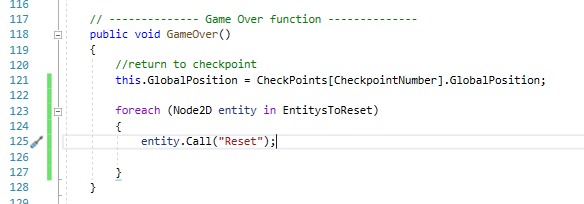
The next step in making the switch is making it so switches can be set to reset upon the player's death. I already set up the framework, but have hard-set the flag to false for now. To make this work, connections to or from the player will be needed. Likely from the player calling out to the switch run the reset function. This was as easy as adding a "reset" function to the wolf and extending the player's Game over function. This also means that any other entities that I wish to reset only need a function called "Reset()" and for the individual node to be added to the player's list of Node2Ds.
I also changed the name of the function "ResetSwitch()" in Switch.cs to "Reset()" as to not have a function just to call another function when a re-name would be just as painless.
I tested it, and I can say 100% that it works for switches. The nearest enemy wolf is too far from the player to properly verify if it resets correctly, and sometimes it winds up stuck on the lower part of the section it is on. Also if you die standing on a button, the button will remain pressed.
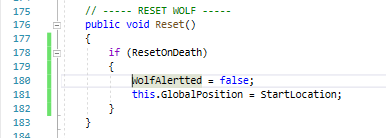
I soon found that the issue with the wolves was due to the wolf's "IsFacingRight" flag getting messed up, so I removed that from the Reset() function, and the wolves no longer go to eeby deeby. Also, I added some If statements around Reset and Process so the wolf physcialy cannot move until Ready has been fully called (so the start location is EXACTLY where I placed it), and you can quickly togge a wolf out of the reseting without faffing with the list (in case I come across a thing where order of resetting is important and need to test something). But the wolves no longer bug out when reset, and more edge-cases are pre-solved! Resetting on death is complete for wolves and switches!
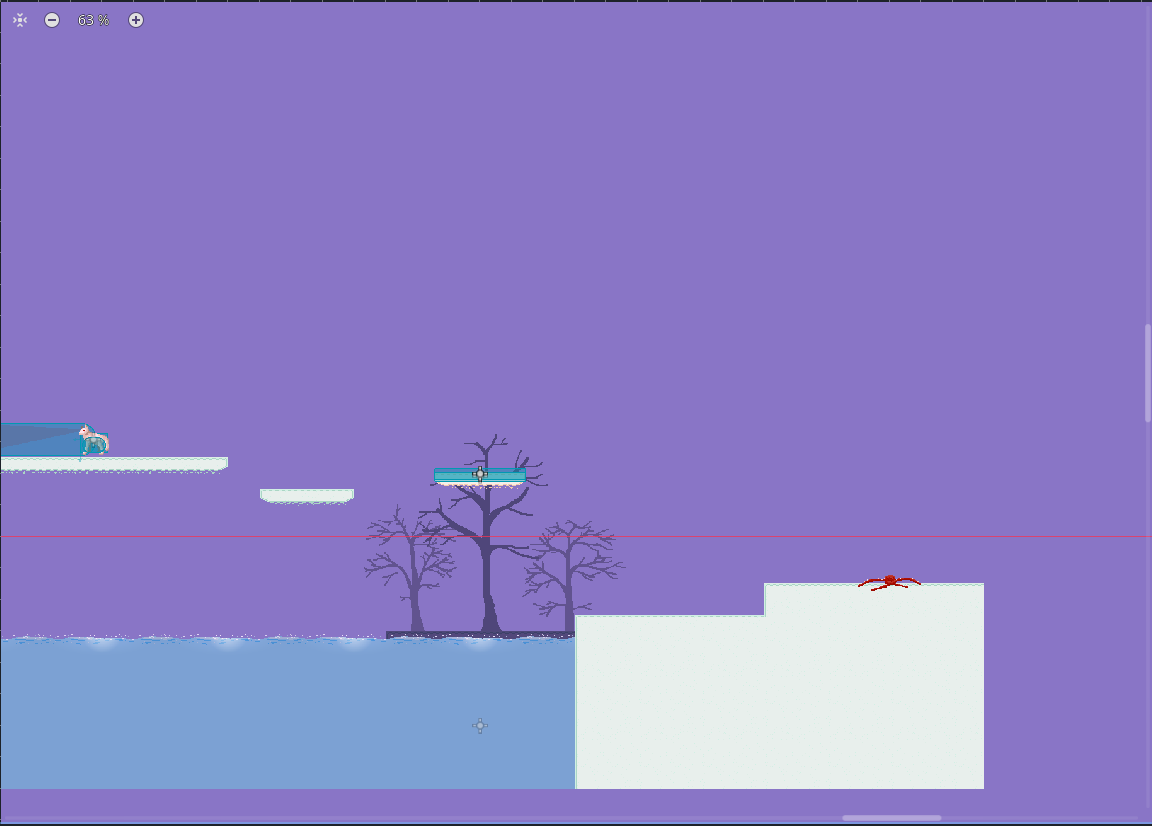
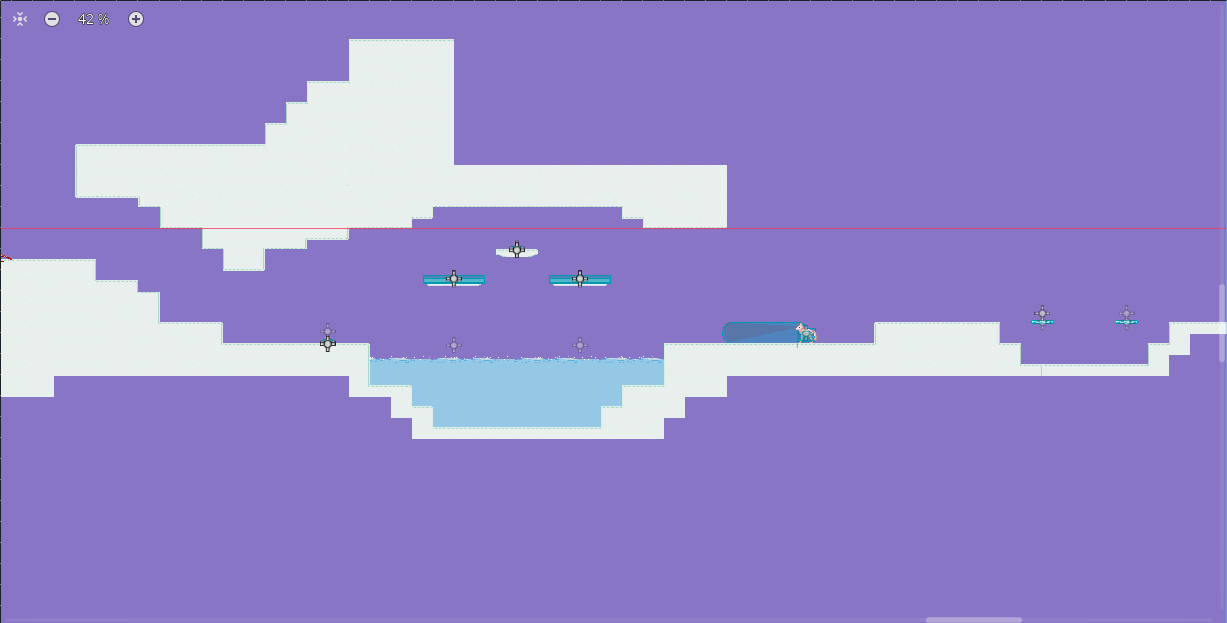
Stage Extention and Decoration
I've not updated this for a while because I've been really busy! But I'm back with a small update! I've got some more of the stage made, added some more puzzles,fixed some tiny bugs, and decorated more of the start of the stage. Cos I made the first batch of fixes, stage extentions, and decorations one day then the second batch at a later date, let me go over them by date:
Day 1; decoration day.
- Found that a wolf was skew wiff. realised he was scaled weirdly in-editor. Removed scaling, fixed the problem!
- Extended the stage a little, adding a few more jumps to the above-water platforming and a falling platform.
- Added more decoration to the start of the stage, expanding the ammount of stage that has beend decorated.
- Sketched up a plan for what to add next and how to introduce a returning enemy that I still need to make so that it can return.
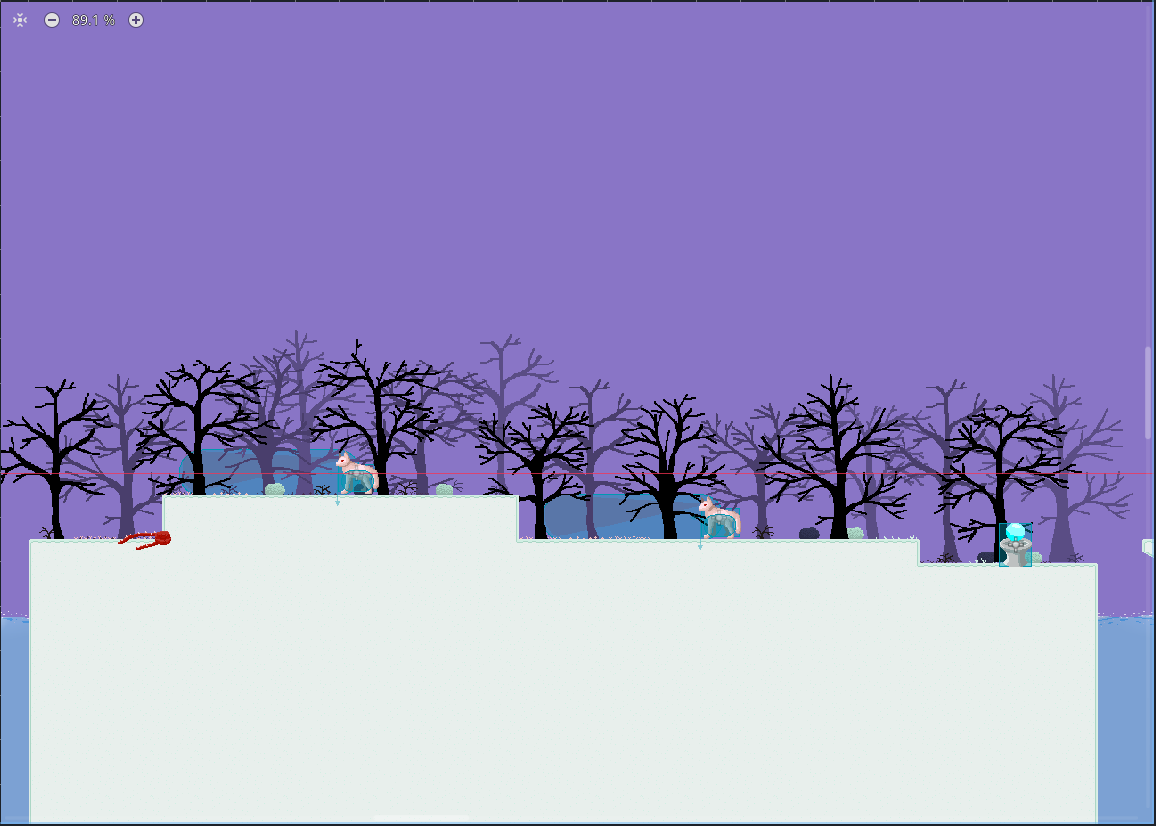
Day 2; cave addition day.
- Added the cave
- Realised that scene objects need to have thier parameters refereshed. I've been altering the variables of scenes that I've made local and am kickingmyself for not clicking "refresh" on the objects I didn't need to make local, so that fixed the third and now fourth wolf whose footsteps and howls weren't auidible and also sorted out the second enemy bird.
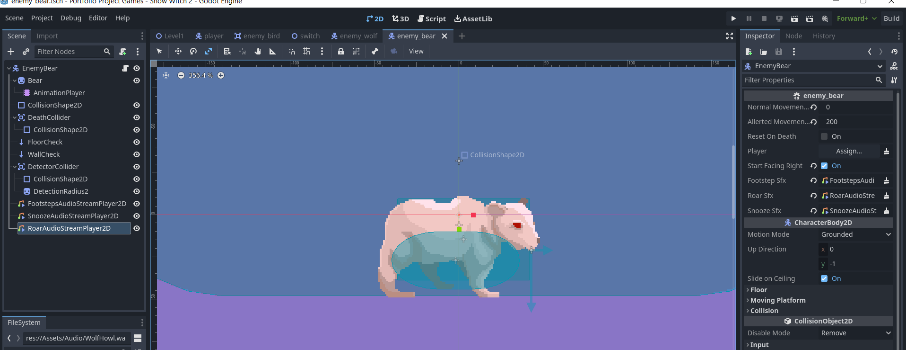
Bears
It was about time I added the third enemy; the bear. But first, I had to make the cave a little more fair, so I put the wolf behind a switch so you can't just fall into it:

Then, it was time to work on the bear itself, starting with shoving as many things as possible onto it, including most of the code, as a lot of that was lifted from the wolf. because most of the code and what goes in the tree was lifted from the wolf, I won't go into too much detail.
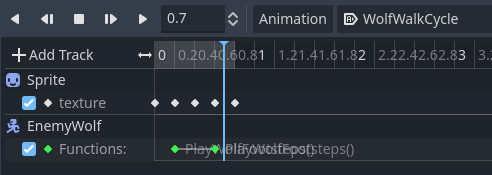
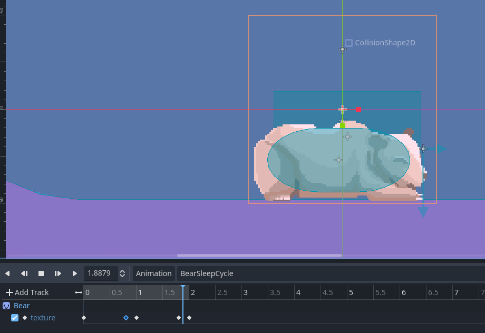
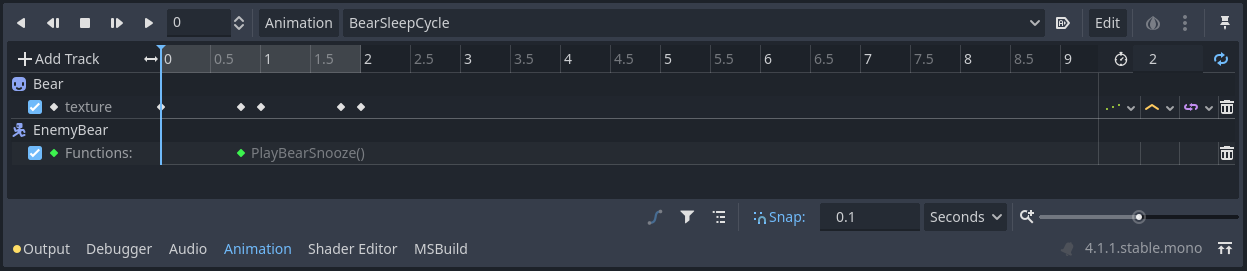
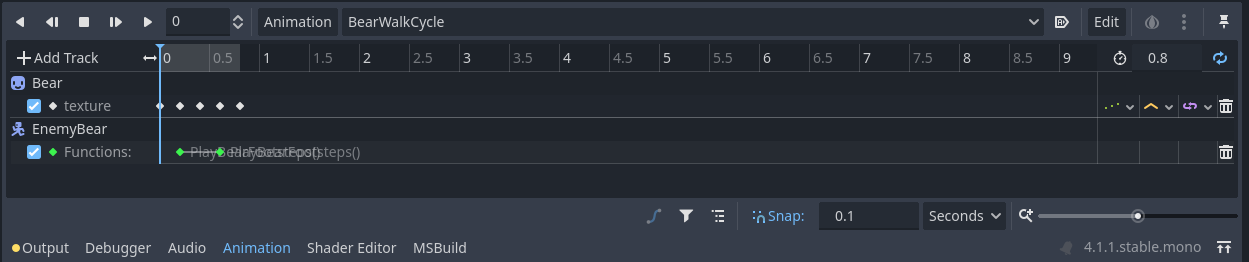
Then, it was time to animate the bear. It just needed two different animation tracks: one for walking and one for sleeping. Each of these animaton tracks call the play audio functions on certain frames, so the walk one calls a function that plays the walking sound effect, and the sleeping one calls the snooring sound effect. The roar is called in the code when the player is spotted the same way as the wolf's does.
Then, I had to flip the bear as it was acting really weird when this way around.
I then had to research into how to switch the animation track, and I used this: https://docs.godotengine.org/en/stable/classes/class_animationplayer.html#class-animationplayer-method-play, but everything else was easy, as the bear is just a perculiar variant of the wolf, so used all the base code, just with several major modifications, and once I attenuated the audio, it was already done!
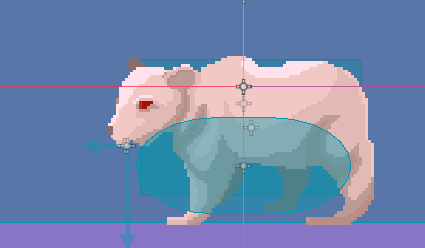
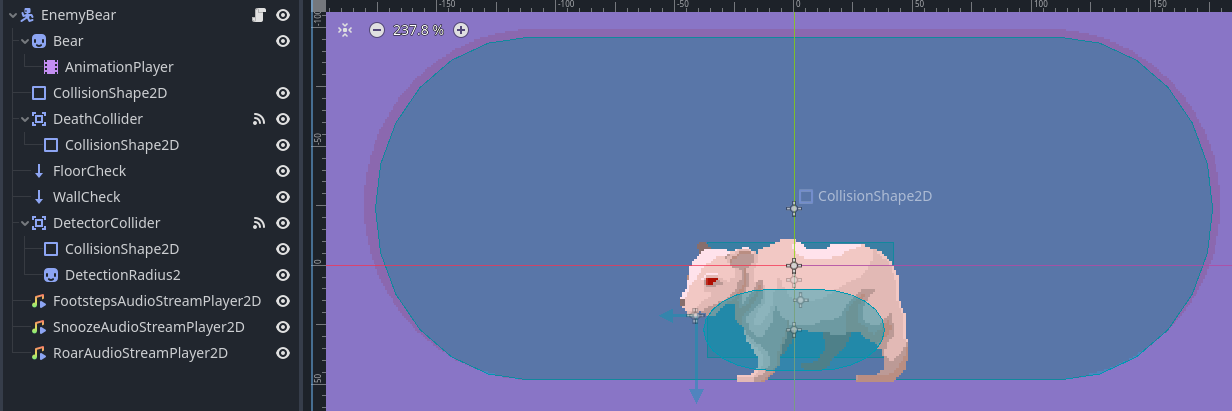
Here's the bear and its higherarchy:
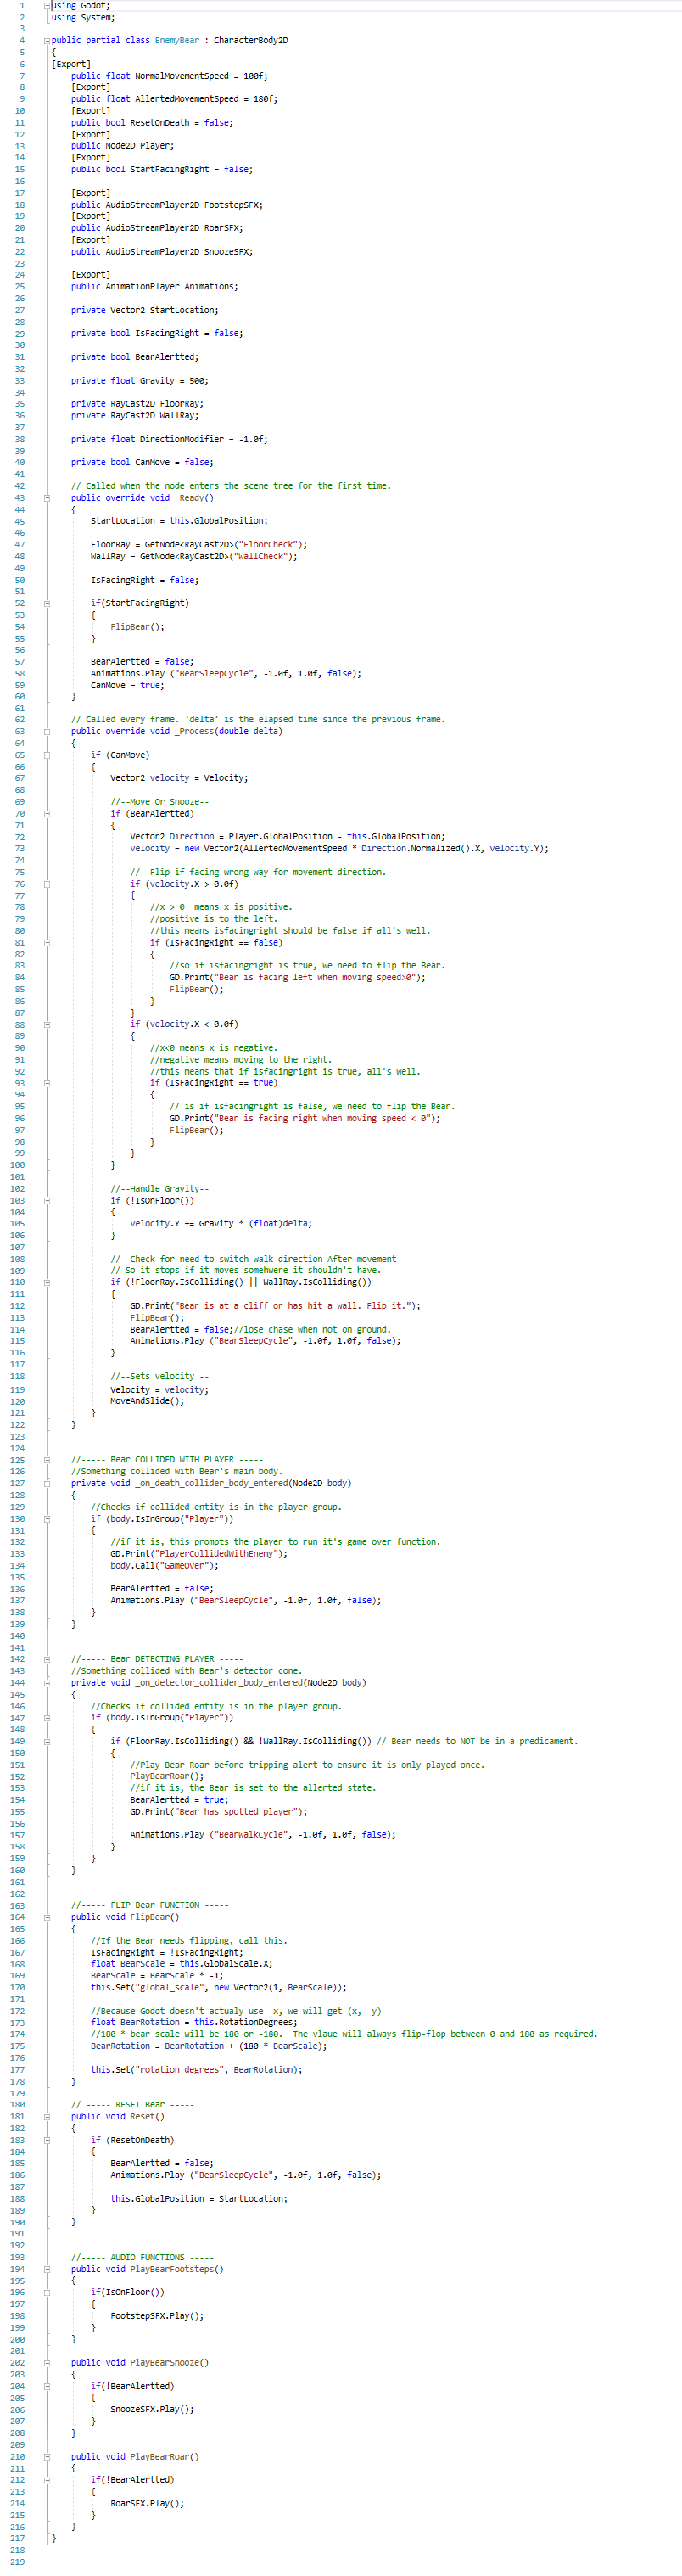
Here's the code:
Then, I placed the bear in the stage and made alterations to the stage accordingly to give the player a safe introduction to this beheamoth:
I also went and made the stage higherarchy more bearable to look at.
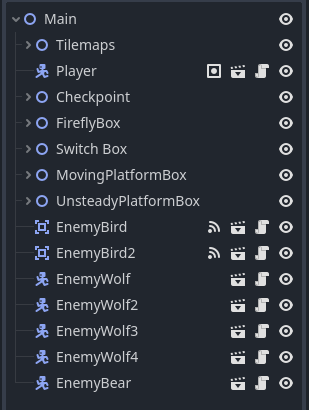
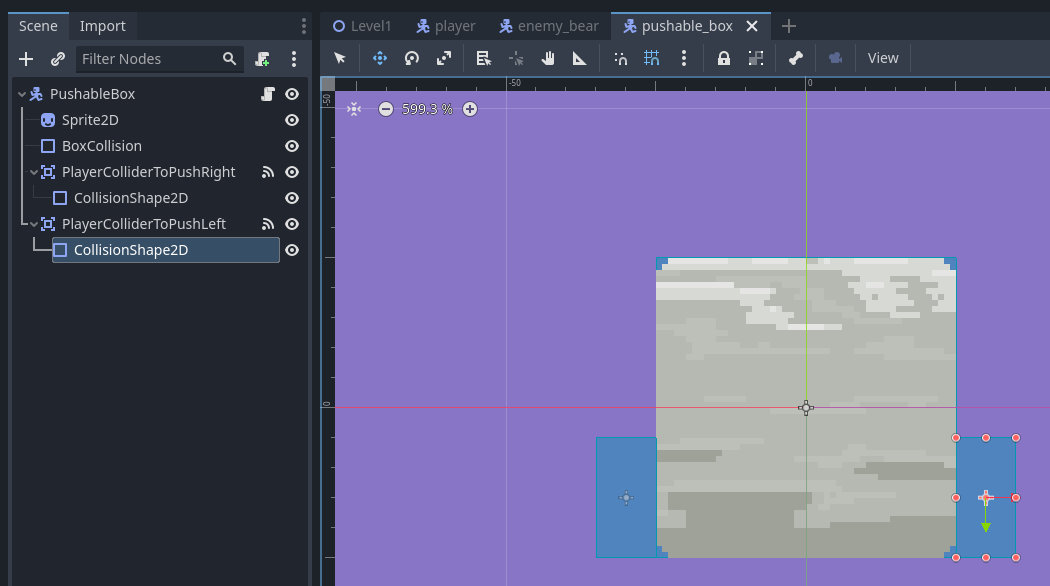
Pushable Blocks
It's time I got round to dealing with something that has long been something I have been wanting to add and dreading to add; the pushable block.
I wanted it to be better than Snow Witch 1's pushable block, so for that, I had to make it not just a physics object, but it needed to have code.
But first, the box itself:
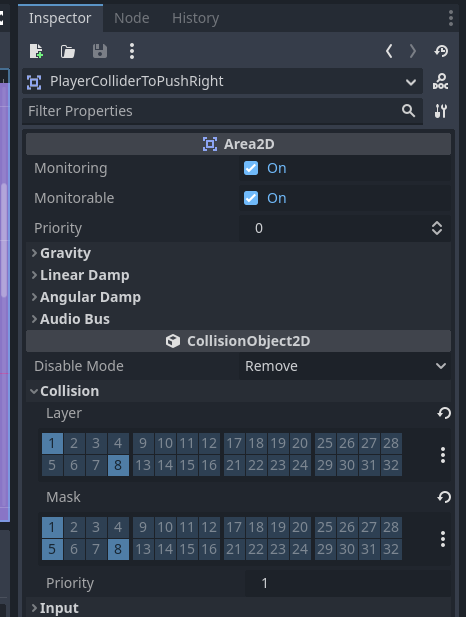
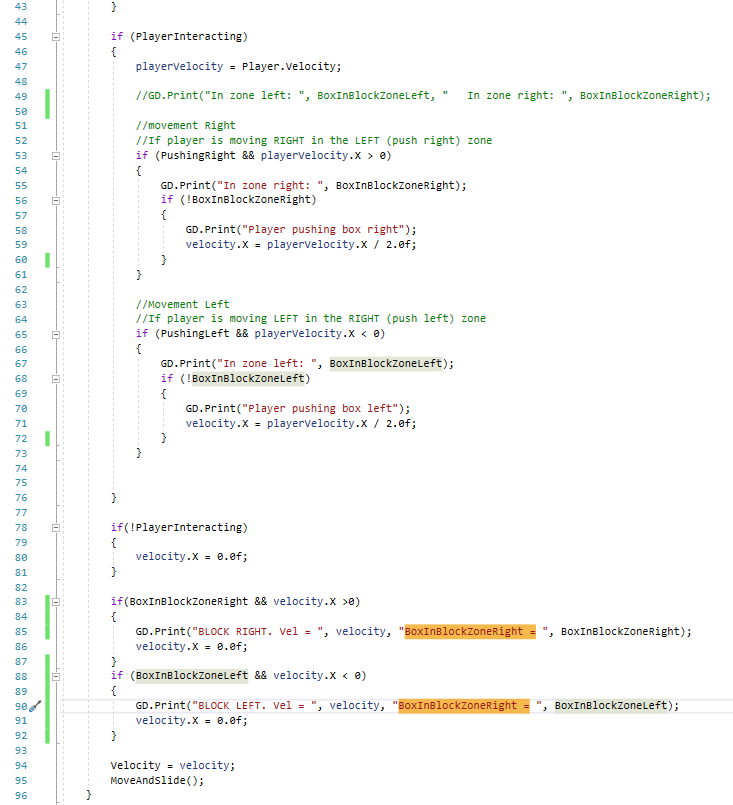
The interactable portions are low down as to hopefully ensure that the player is on the ground. The box's own collision is a different collider. At this point, I only had a rudamentary codebase that functioned to tell me if the game thought the player was pushing the box right or left (this right or left is based on the collider the player enters: right collider means the player should be pushing the box left, left collider means the player should be pushing the box right).
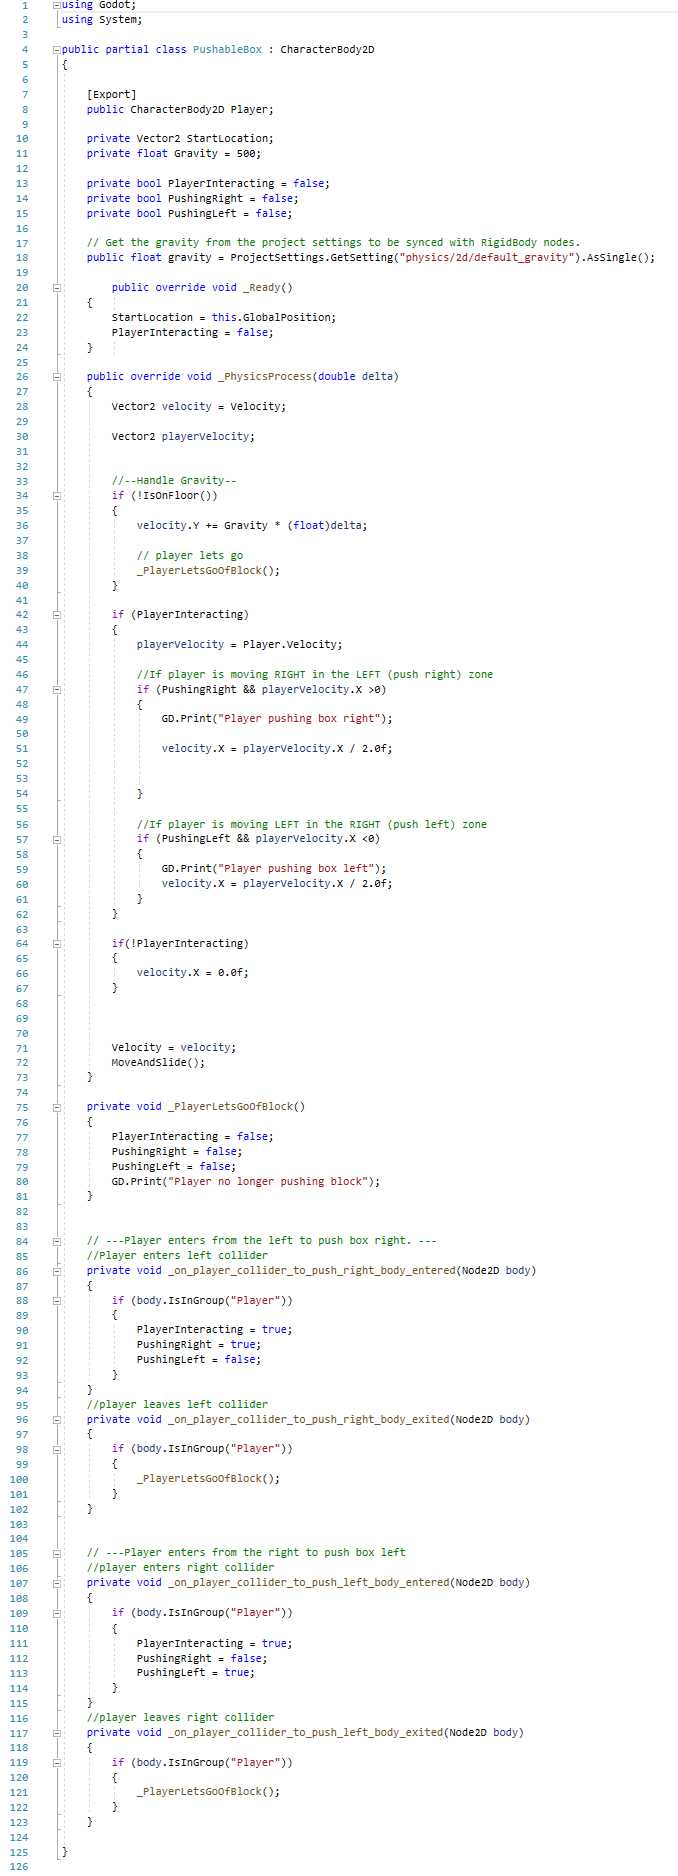
After some testing and modifications, I was able to get the code to a state where it would corectly know if a player and only a player was pushing it, but not anything else. The box also obeys gravity and the player is deemed to be no longer pushing the block if the block is falling.
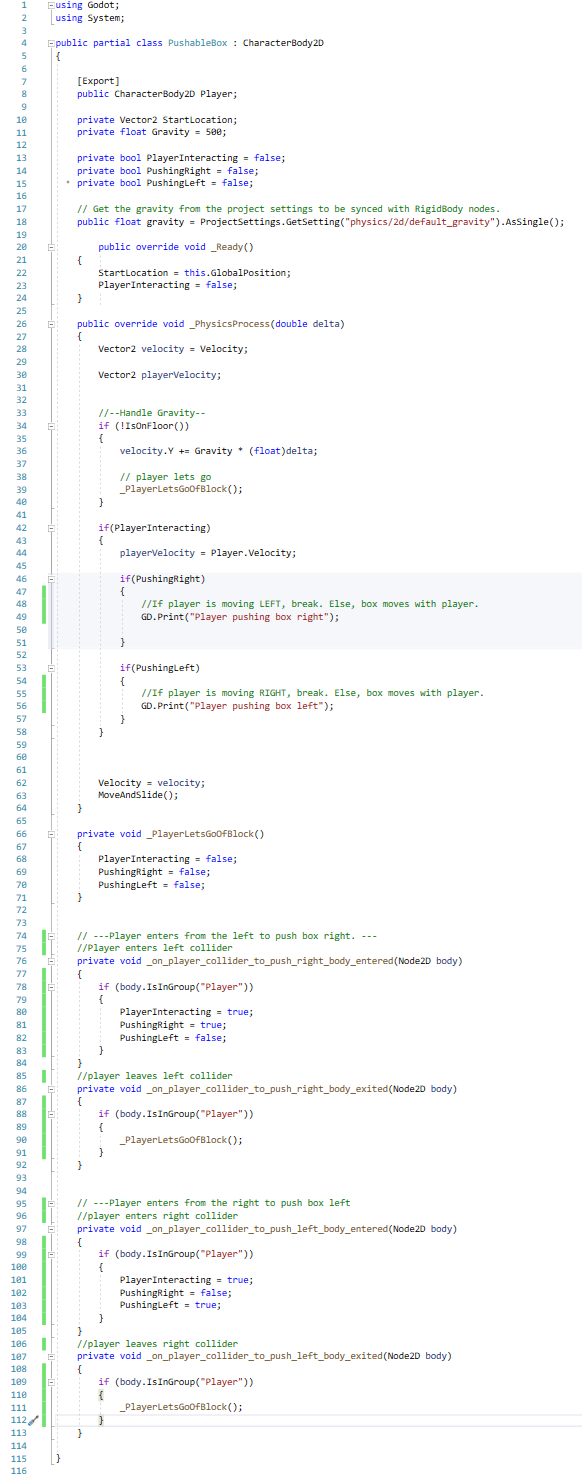
With the code outlined, the next thing to do was to see if the x component of the player's velocity was matching the push direction. You can already see the start of this with the code getting the player velocity, and the comments that say that the aformnetioned velocity is to be compared with the intended pushing direction. This was intended to be done as a nested "If"; the contents of the comments was my initial plan, but instead of having the box consider itself let go, I intend for the "area exit" function to handle letting go; if the player is not moving in the push direction, the box will simply not move, but remain stationary, and the player will no longer be "pushing" the block once they move out of the block's range.
To make the block move when pushed and stop when not pushed, here are the modifications that were made:
As this means that the box skids once the player stops pushing, I also reduced the range of this final push by making the detection ranges smaller.
With this set up, the pushable blocks work. However, sometimes the box doesn't seem to want to work. I'm not sure if this is a collision issue, or something else, but one in maybe 20 tries at pushing the block will result in the block not moving. Increasing the size of the detection zones slighlt fix it and make the issue happen less often.
This is what I decided to have the detection nodes be for now:
And here is what the code looks like:
The plans for what to work on next will be a method to prevent blocks being pushed the wrong way, as once I start placing blocks in more free areas, this will become a problem as people could push a block the wrong way. Though for now, it is impossible for this block to be pushed the wrong way with how and where I placed them.
To fix this, I added blockers for the blocks. These beauties are invisible to the player as they only consist of an Area2D and its collider shape, and the player can't collide with them either as they only collide and mask on layer 8 (which I added to the push block itself as well). I also gave this object its own layer group.
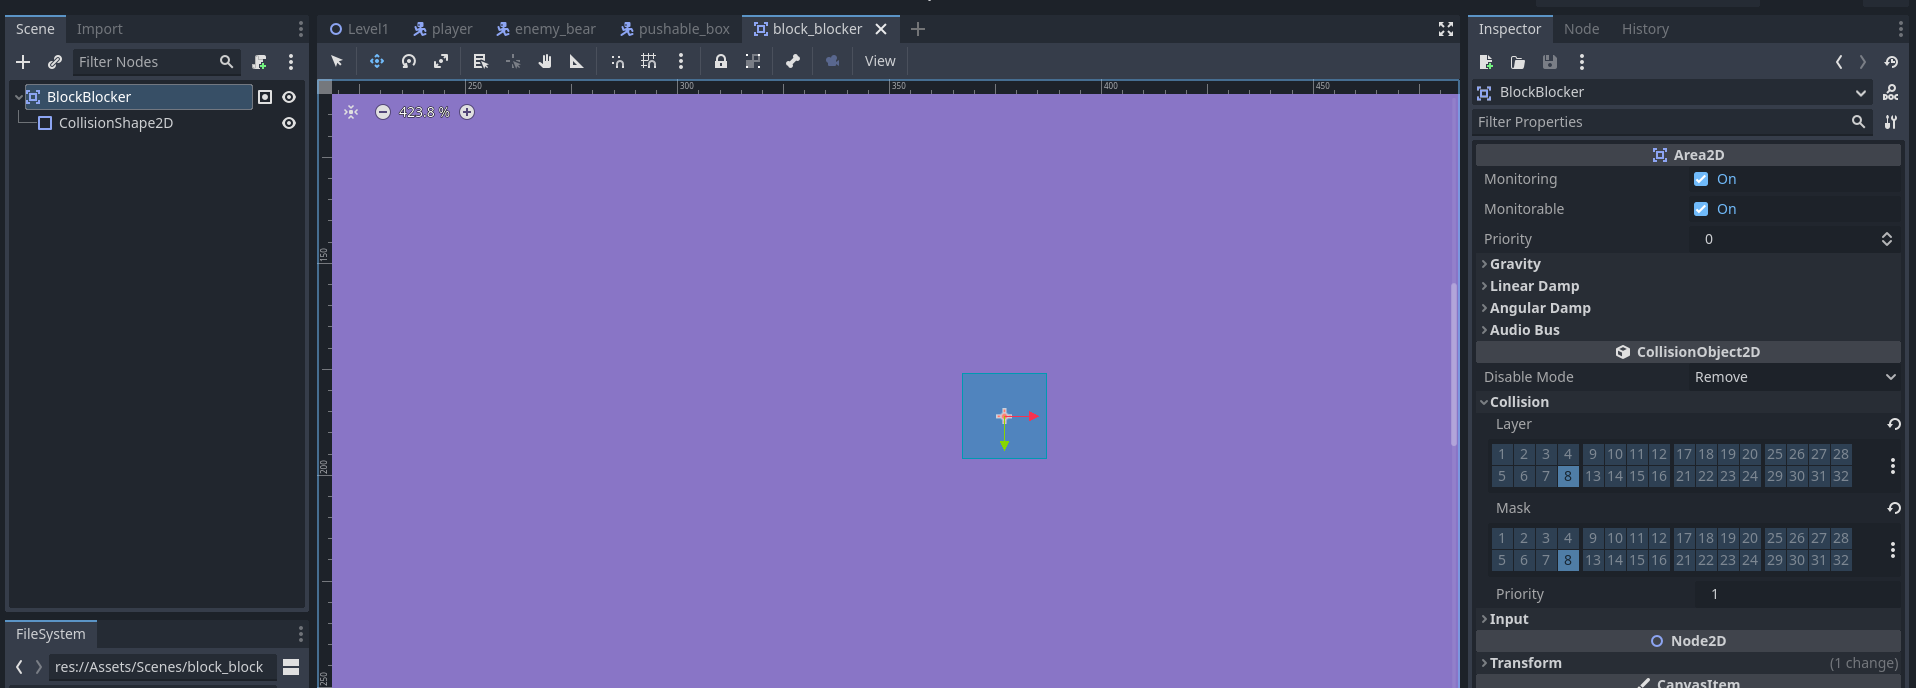
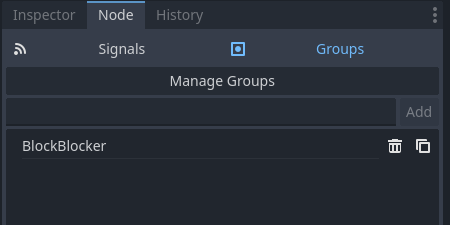
To reduce the amount of objects running code, all of the code that allows the blockers to work is in the pushable block. These blockers are just an Area2D that exists to be detected by the pushable block.
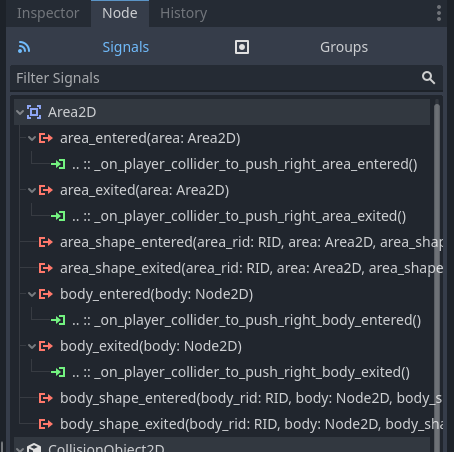
To get the pushable boxes to detect these blockers, I had to add layer 8 to the colliders and add new signals that picked up the area2D type.
To add the functionality to the code, I had to make 3 alterations to the push box code.
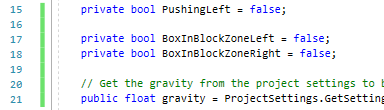
1: adding two new variables.
2: the aformentioned signals.
3: how the box stops moving when the signal is received.
This first bit of code just adds the variables that I knew I'd need.
This second bit of code is the functions that were added when I added the signals, but properly populated to flip the new variables for which detector the blocker has been detected in to true or false depending on if the blocker is entering the detector area or leaving it.
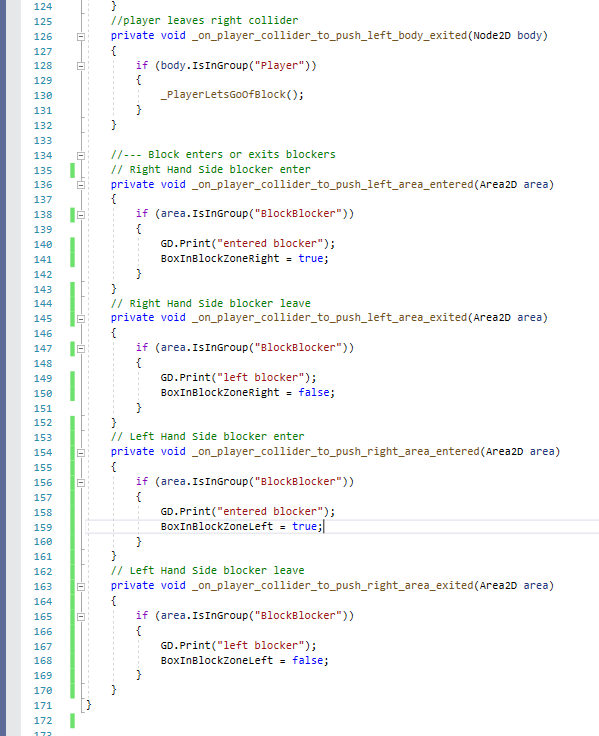
It took many MANY itterations, but this third bit of code handles making sure that if the player attempts to push the box whilst an end is in a blocker, the box won't move in that direction. It can still be pushed the oposite direction (provided that end isn't ALSO in a blocker). This means that blockers are not bound to a specific block, and blockers can be put on each side of a block to make a block that is actually stationary!
Fixing the moving platforms and other miscellaneous changes
It's been a few months since I've picked this up. Work has kept me busy. But it's about time I got back into this.
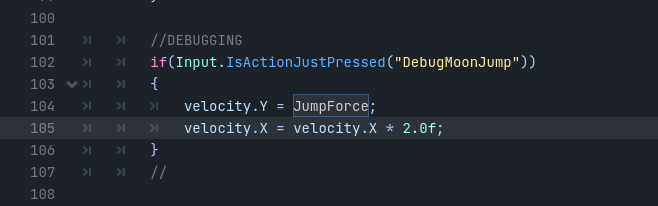
I started off by adding the foundations for controller support, and a debug feature.

Then, I added the debug feature. This has probably saved me several minutes already. It's a simple moonjump with an attempt at increasing my speed. It gets the job done.
Finally, it was on to fixing the moving platforms. Some of them worked, some of them inexplicably didn't. I found the culprit to be the fact that I was comparing the exact position of the target node with the exact position of the platform. This means that if it's off by even 0.0000001 units, it won't progress to the next node. So I dredged up my code from Snow Witch 1 and found that I solved this issue in that game by using a function that got the distance between two vectors. Godot has something similar in the form of distance_to, which is DistanceTo in C#. With that fixed, I was then also able to go about adding another setting to my moving platforms that would allow me to have them stop at their final node. This feature is only intended to be used with standing on the platform, so it was coded with such in mind.